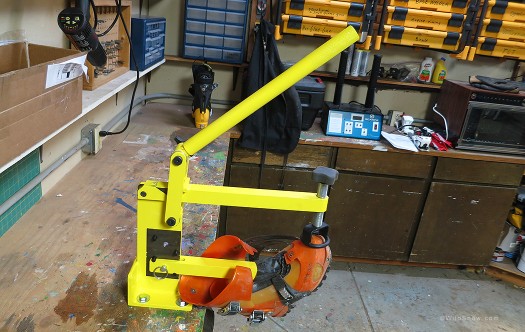
I've searched years for a ring press, but never liked what I'd get for the money. Earlier versions all had arms that made it difficult or impossible to do a toe box punch. Latest version from either Ski Kare or Sun Valley Ski Tools is primo, with a reach system that makes doing the 'big toe punch' incredibly easy. Using this tool, I can quickly increase the effective length of almost any backcountry skiing boot by a half to a full size (depending on the foot shape.) This will be a huge help with our boot reviews, as we like to correctly fit each boot before evaluation and can't run off to the boot fitter every time we get the latest shoe. More, the usual sample size in pre-production boots is a 27, but that's frequently too short for Americans, myself included. On the other hand, size 27 boots are usually the best fit for my skinny ankles. Now, I just lengthen the 27 a bit and get the perfect fit. Side punches are easy as well. Combined with our other ski boot fitting tools, we should be able to keep most of our boot testers' feet smiling.
18 comments
Awesome looking tool! When is your shop open to come use your toys ;)?
What is the cost of that, the website does not show and I can’t get the Cart to work.
aaron, you need to have an account with SVST to order to see the prices on their website and order through them.
you might be able to order without and account but i’ve never tried since i just buy throiugh my shop.
It’s around a grand for the whole thing, if you’re just curious. All the boot fitting tools are extremely expensive.
Do you use a standard heat gun or some fancy boot fitting heating device?
If you use a normal heat gun, how do you control the temperature? Is it more a matter of feeling/experience or are there strict rules to follow? I ruined a pair of boots a couple of years ago trying to do it myself (the shell started “bubbling”) and have since then put my trust in the local boot fitter.
Cool tool. But not something that most is will be able to justify. Does anyone have ideas about how to do this for less tach a grand, There must be a dirt-bag alternative.
Tom, I’ve done boot punches with everything from trailer hitch balls to tennis balls on the inside, various clamp arrangements on the outside. Some worked, some did not. Doing a toe punch is particularly difficult without a ring press or a boot expander, which is equally as expensive.
One of the best “dirt bag” boot punches I’ve seen involves stuffing a tennis ball into the forefoot area, to create width room at ball of foot. You then clamp down on top of the boot, which in turn causes the tennis ball to bulge to the sides. Problem is you end up with less height. Of course, any aggressive boot shell punch has to pull some volume from somewhere else, but the ring press does that the least because it isolates the area you’re working on.
Phil, standard best practice is to use a digital infrared thermometer, as well as experience. Most boot fitters use a forced air heat gun but some use infrared heaters. Not just any heat gun works well, I like one that has adjustable temperature (not accurate, but makes it easier to get the heat gun working well, not too hot or cold.) With the thermometer triggered often, I use 250 F as my guide when doing this with Pebax, PU is easier and I usually don’t use the thermometer, just heat it till it changes appearance and starts to stretch. I forgot the temp for Grilamid, it’s similar to Pebax but hotter. Some of the process involves a feel for how much the plastic will spring back after the work is done. Biggest problem is the inside mandrel on the stretching machines sucks up heat. Pre heating the mandral helps, but isn’t ideal. Machines are available with heated mandrels, and yep those our beyond our budget (grin).
All the experts recommend keeping junk shells around to practice on. That’s what I do. And since I don’t do boot fitting full time, I sometimes practice on a junk shell specifically before a new project.
http://www.wildsnow.com/1562/pebax-melt-temperature/
Tom, I just finished building my dirt bag boot press and shell spreader. Uses a giant deep reach woodworking bar clamp and a wooden last that get’s pressed into the front of the boot. Takes more work to shape the custom last plug but after you make one for your foot you can use it on multiple boots. Tool also has 4 welding vice grip clamps that I can use to spread the shell when doing liners molds or shell grinds. Will post a picture URL tomorrow. Total cost was around $150 for materials and around 8 hours of time to build. Bessy bar clamp was $85 so that was the most expensive part.
Second the using a discarded boot to practice on. It’s easy to over stretch or go past the DIN toe spec until you get a feel for it. Although I did manage to fit my size 29 foot into my dad’s old size 26 boots. They won’t fit in a binding anymore, but was good practice.
Guest blog?
Sure would be happy too.
Nexus, email using the contact link at top of page. Thanks, Lou
I have been looking for a convection oven to do liners in. My home oven is busted and I need to find one. I have googled the heck out of it of course.
Any ideas?
Scotty, any oven with enough room will work. Problem is, nearly all are too small, and the larger ones are super expensive. I spent too much on ours, it was used, full of grease, but it worked after lots of cleaning. It’s a Farberware, not sure what model. I got it on Ebay. Please let us know what you find. I use the oven a bunch for craft work and boot fitting, one of the best tools I have but again, I paid more than I would have liked. Lou
Lou you have the yellow boot press that comes from Ski Kare in Golden pictured. SVST makes an identical unit in blue.
Bob, thanks, Ski Kare website is less than ideal, so I was focusing on SVST and l had them on my mind. I’ll edit the text to be clear. Lou
Great conversation! Am looking forward to seeing Nexus6’s boot press.
Would a concrete or cast mold of your foot work to press into the heated shell to mold the shell to the shape of your foot?
Comments are closed.