While folks have been using this concept for a while, I was introduced to this idea from Steve McClure of the Seattle Mountaineers, a navigation expert and editor of the classic mountaineering textbook, “Freedom of the Hills”.
The takeaway: GPS is great for identifying your exact location. It’s not so great, by itself, for following a complex off-trail route. Instead, use your compass along with your GPS. Drop waypoints along your route at important junctions, use a GPS app to get distance and bearing to the waypoint, and then follow that bearing with your compass.
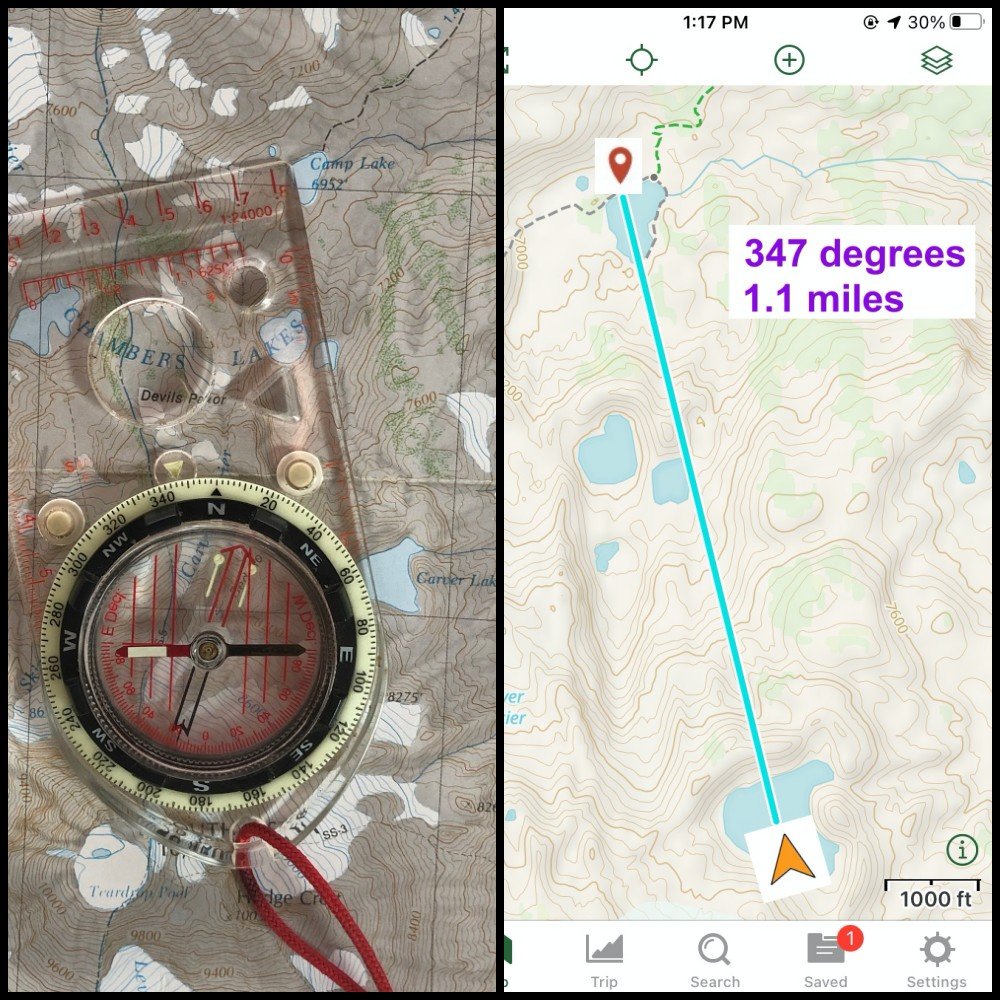
You’re at a lake, which you can locate on your map. On your map, you see another lake that’s about a mile away towards the north / northwest, with no trail to it. You want to go camp there for the night.
You have several navigation options.
Map and compass: Get out your map and compass. Put either long edge of your (declination adjusted) compass baseplate between your location and the lake, then rotate the compass dial until north on the compass points to the north/top of your map. This should show you the bearing between your location and the lake. Pick up the compass, hold it flat in front of you, rotate your body and compass until the magnetic needle matches the orienteering arrow. You should be facing the lake; start walking. Hopefully there aren’t any cliffs, thick vegetation, rabid marmots, or other obstacles between you and the lake. (Learn how to do this here.)
Phone only: Using your preferred navigation app, add a waypoint at the lake you want to go to. Use the “Guide Me” (or similar) function, which tells you the distance and bearing from your location to the lake. Start walking, holding the phone in front of you pretty much all the time, using the directional arrow in your navigation app to walk you to the lake.
Both methods can work, but they have some problems.
- With the map and compass, you need to have a printed map, a compass, and know how to use them together. It can take a little time, can be tricky to do if the weather is not cooperating, and if you do it wrong you can introduce large errors, some even as big as 180° if your compass is backwards. (You also have to be able to find your current location on the map. If you’re completely lost, this doesn’t work.)
- With only the phone, you decrease your awareness of the terrain around you, because you’re doing “heads-down” navigation, staring at your phone screen the whole time. Plus, you’re draining your phone battery unnecessarily by leaving the screen on.
Instead, try a hybrid method: the “GPS bearing”.
Rather than measuring a bearing between your location and the lake with the old school map and compass method, you get the distance and bearing from your navigation app, and then use your compass to follow it.
Pretty much every quality backcountry navigation app has some function to tell you the distance and bearing from your current location to another point on the map. As I write this, in autumn 2021, using Gaia GPS, you can simply tap the screen. That brings up a pop-up window that says “Marked Location”, and tells you the elevation, distance, bearing and coordinates of the spot you touched. If you have a saved waypoint you’re trying to navigate towards, you can use the same technique. Tap the waypoint and see the distance and bearing in the “Marked Location” pop up box.
Now, instead of staring at your phone and following the line and arrow to get to your destination, you dial your compass to that bearing.
(In FatMap, while on the “Map” screen, tap the screen in a specific spot, and an orange Pin drop appears. Like Gaia, FatMap provides GPS coordinates, elevation, and an option for “Route To.” If you then tap the “Route To” button, you’ll get an option for distance via different modes of transportation. These include “on foot,” “mountain bike,” “vehicle.” This function also provides approximate time to the waypoint and total ascent and descent. Currently, tapping a waypoint in FatMap will not offer a bearing to a waypoint from your current location.)
(In onX, if you’re navigating freely on a map with no predetermined trip planning, tap the screen on the desired location for a waypoint. Then save the waypoint. Once saved, you’ll get a GPS coordinate and the option for “go to waypoint,” which provides the distance in a straight line. You also have the option to click “navigate to waypoint,” which offers a directional arrow – in that case, your eyes are often focused on the phone. According to a representative at onX, they will add a feature that provides a bearing soon.)
In the photo at the top of the page, your phone tells you it’s 347° from your location to the lake. Rotate your compass dial to 347. Hold the compass flat in front of you, with the direction of travel arrow pointing away from you. Rotate your body and the compass until the magnetic needle matches the orienteering arrow. Schweeet, you’re now facing the lake. (Learn how to do this here.)
Turn off your phone screen, put your phone away, and start walking towards the lake. No need to be religious about staying exactly on a compass bearing; walking in the general direction is usually fine. Adjust your route as necessary to get around obstacles. Have a quick look at your compass every few minutes to be sure you’re more or less continuing in the right direction.
After 10 minutes or so, take your phone out, and simply repeat the process: tap on your objective, and get a new distance and bearing to follow. The distance should decrease as you approach your objective. The bearing will change a bit, depending on how much meandering you’ve done since you started. Change your compass dial to that new bearing, put your phone away, and keep on walking.
You’re saving your phone battery, and you’re navigating “heads-up” with much greater awareness of the terrain.
The old school “follow-a-compass-bearing-on-a-straight line” method can work okay if the terrain is open and doesn’t have any obstacles, but that’s not going to happen much in the mountains. That’s the beauty of the GPS bearing. You don’t have to focus on staying on the single compass bearing; you can choose the route that makes the most sense, occasionally repeating the process of getting a new distance and bearing, and making small adjustments to your course as needed.
Another significant advantage of using GPS bearings is that you don’t need to know your current location on the map for it to work – that’s a major drawback of the map and compass method.
Even if you use GPS phone app and compass, it’s still an excellent idea to bring along a paper map. If your partner also has a phone GPS app, a fully charged battery to start the trip, and a back up battery with charging cable, that’s a pretty good redundant system. Yes, phone batteries can die, but maps can also blow away or be ruined by rainfall.
Let’s be honest, if you have the choice between using a slide rule or a calculator to do some arithmetic, you’re going to reach for the calculator every time. Yes it uses batteries, but it’s also a superior tool. Same with the phone GPS. Combine it with a compass and you have the best of both worlds: always knowing your exact location and the direction of your next objective, maximum phone battery preservation, and better awareness of the terrain around you.
You don’t necessarily need a compass to use this method. Good backcountry navigation phone apps like Gaia GPS and CalTopo have an indicator arrow that changes direction as you rotate your body, which can help point you toward your objective. However, using a base plate compass can still help you preserve battery, because you’re not checking your phone as often.
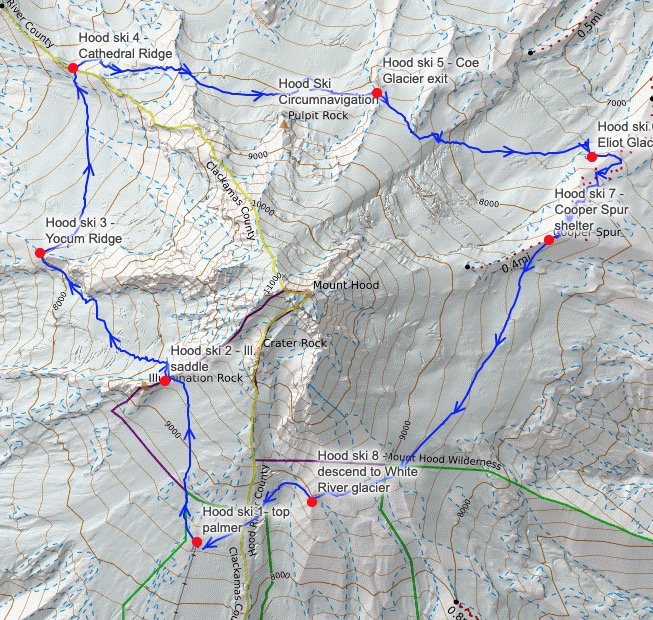
The example above is pretty simple, going from one point to another in fairly open terrain for a short distance. We can use the same principle for a longer more complex trip, simply by adding additional waypoints. Here’s an example of a ski circumnavigation of Mt. Hood.
The blue line shows the approximate route, which of course changes based on snow conditions, crevasses, etc. The red waypoints show some key decision points. Instead of trying to ski staring at the blue line and attempting to stay on top of it (which of course would be pretty ridiculous), instead focus on moving from waypoint to waypoint. If there is a bit of a detour, and it’s not a straight line, such as between points 3 and 4, simply tap the screen on your phone on the track line to add an intermediate marker point, and navigate that to stay on course.
John Godino is based in Portland, Oregon where he runs the website alpinesavvy.com. You can also follow him on Instagram @alpinesavvy.