Ever heard of soap on a rope? How about a dope on a rope — or a sled on a rope? When they told me lot’s of people on Denali pull gear sleds on a rope, I knew right away that wasn’t the way to go if you’re on skis. I’ve done it. In my experience, pulling cargo on snow with a rope works on a nice constant uphill pitch, but glide over a roller or head downhill, and you’ll have a 50 lb artillery shell headed straight for the backs of your knees. You can try to depend on your crevasse roped partner to control the thing, but he’s on skis too and isn’t going to be carefully belaying your sled down behind you while he tries to stay upright and watch for his own load. The solution is easy, sort of. Use a purpose built gear sled with rigid rods. But how do you attach those to your pack or harness, and is the stock configuration the way to go? Nope, not for us. Check out the evolution.
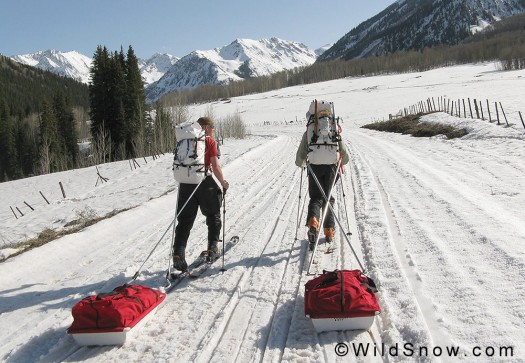
Out on a training and testing slog with our CiloGear packs and gear sleds. It took a few of these trips to get there but I think we've got our systems figured out. Click image to enlarge.
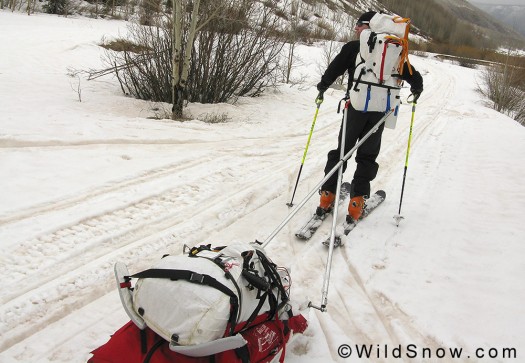
The full configuration involves ergonomically correct attachment to the backpack, crossed rods for stability and natural turning, and some sort of flexible joint where the rods connect to the sled. Click image to enlarge.
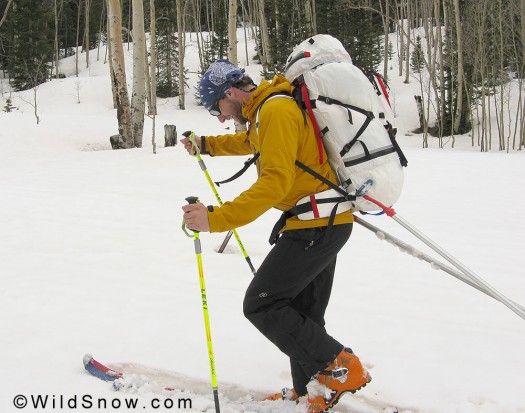
Side view show how the rod ends are attached to the CiloGear 75L Dyneema Worksack in close to the skier's body. If the rods are attached farther rearward on the pack the pull becomes inefficient due to oscillation of the pack mass. Conversely, attaching to the sides of the waist belt is uncomfortable, and makes the pack difficult to remove if the rods are under tension.
Perhaps the biggest dilemma with expedition pulk use is whether you pull with the sled attached to your pack, or use a dedicated harness. Either way works if you tune everything at home. But on a glacier you’ve got a climbing harness. Add your pack waist belt and your pulk harness belt to that, and you may have a problem keeping everything working together without it feeling like torture due to bulk and complexity. Instead, for a sled attachment point CiloGear built a small loop of webbing into our 75L Dyneema Worksack Dyneema backpacks, located next to the “triangle” where the shoulder strap anchors. This location is close enough to your body so as not to cause the pack to oscillate as you walk.
A defining feature of CiloGear packs is how you configure them using small steel and plastic clips that “keyhole” through each other. As variations of that, our final version of attaching our sleds is to use a 5/16 eyebolt located at the ends of the rods. The CiloGear clips keyhole nicely through the screw eye (after expanding it a bit while building), and likewise we can pull the webbing anchor through the eye and simply pin it with a ‘biner (this method is awkward with a full pack and heavy sled, see below for another method). The eyebolt is attached in such a way as to allow us to bend the ends of the rods so they clear the wider part of the backpack.
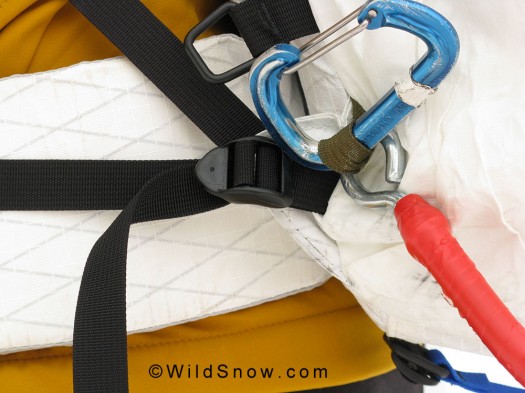
Simple sled attachment on CiloGear pack keeps the forces close to your body to keep the pack stable as you trudge -- and solid as you ski. This attachment method does have a tiny bit of play, but it's minimal.Final version of rod has more tape to prevent abrasion, the the pack is protected by a patch of Seam Grip.
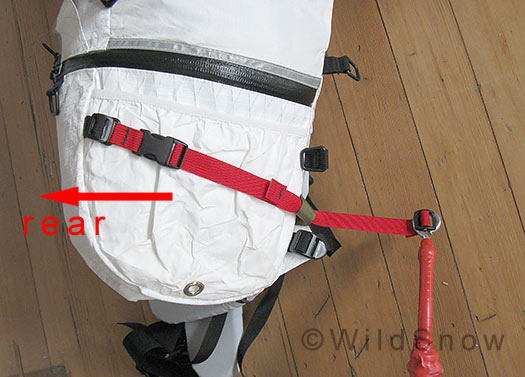
The better method of attaching our eyebolt equipped rods begins with a CiloGear compression strap, which is passed through the anchor on the pack then keyholed into the eyebolt. You then tighten the compression strap for a play free attachment. Huge advantage of this method is it's very easy to get the rods on and off the pack even if heavy loads or awkward positions bind things up.
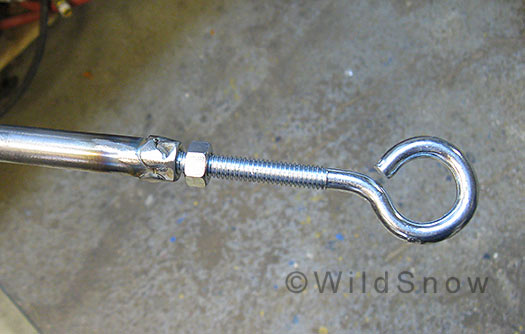
We installed the eyebolts by making adapters out of steel tubing with a nut welded on the end. the eyebolt is then installed with some Loctite and a lock nut. We found that longer rods add a lot of efficiency as well, due to the front of the sled getting a lifting force rather than a pulling force if the rod angle is too steep. Thus, while making the adapters we also added some length to our rods.
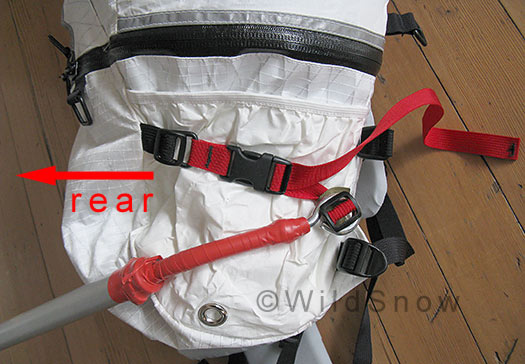
Compression strap sled attachment method with strap tightened. Zero play, easy to slack the system and remove the rods by simply loosening the strap or popping the buckle open. Only improvement we can think of is to have some sort of quick release on the actual attachment point.

Key to the ergonomics and overall success of this system is the ends of the rods being bent to clear the backpack.
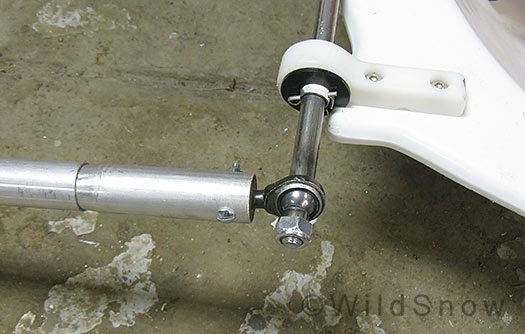
Key for skiing with a sled is to have flexible rod attachment at the sled as well as your pack. In Louie's case, we went for it and used these small heim joints for a flexible connection that doesn't fold up the way rubber hose does. We really like this system, but it's time consuming and expensive to cobble up. You can source the heim joints at a Yamaha snowmobile dealer, they're steering joints.
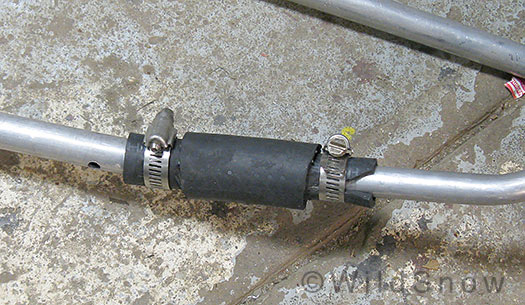
A common method to add a flex joint to ski sleds is to use a section of rubber hose. Garden hose works but is fragile when it gets cold. We did better by using automotive fuel/water line, and including a stress relief sleeve that stiffens up the connection so it doesn't tend to fold when the sled pushes on a downhill section. If we have time, we'll rig all our sleds so they have the option of either rigid connection or hinged, as the hinged connection (other than Louie's) can break.
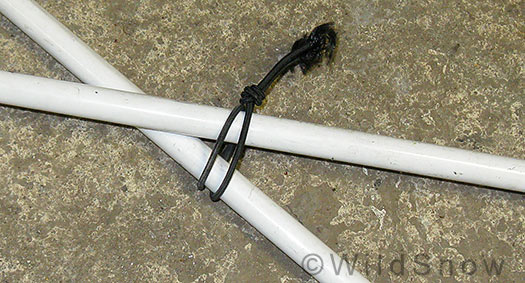
Lastly but still important, crossing the sled rods makes the sled move with your body during turns, and works against the sled flipping over. A rubber 0-ring or wrap of bungie is necessary at the center of the X, and it's good to anchor the wrap so it doesn't tend to migrate up or down the tubes (this wrap is not anchored.)
Lots of work rigging seven sleds and packs with all this stuff, but during testing we could easily feel the added efficiency so all the effort is worth it.
WildSnow.com publisher emeritus and founder Lou (Louis Dawson) has a 50+ years career in climbing, backcountry skiing and ski mountaineering. He was the first person in history to ski down all 54 Colorado 14,000-foot peaks, has authored numerous books about about backcountry skiing, and has skied from the summit of Denali in Alaska, North America’s highest mountain.
25 comments
I have done a bit of sled hauling, and find that they work great in the flats and ok on gradual slopes. Steep sidehills are the worst.
Yeah, the reason most of us are using 75L packs is so we can easily go without sleds if necessary, or at least reduce the weight of the sleds. I’ve got a 60L pack because I just can’t carry as much weight as the other guys, but I’ll admit 60L is a bit small for Denali type work.
Those packs look amazing. I wish they weren’t a million dollars.
They’re actually about a half mil :angel:
I have about 50 days pulling a sled by rope on AK glaciers in my previous life as a “expeditionist”. Just to let you know that a brake can be rigged by having a 1/4″ rope rigged to “loop” over the bow of your sled and create drag to prevent your sled from bumping against your heals or over-taking you. Rate of drag can be regulated by adding knots as needed. When you are loaded with a pack and pulling a sled, speed is not a big factor on the downhill, so a bit of drag is workable.
Being able to reach back and “short-haul” the sled by taking in the rope to any length you desire was very handy. If you need to get into your sled, you do not have to disconnect the waist harnesses to get at it. We tried the rigid poles and they worked OK in flat, featureless terrain. Skiing in and around crevasses field and ice falls I was thankful for a rope. It was also handy for lowering the sled up and over short steeps.
The other factor is it was easier to deal with in a crevasse rescue scenario. It could easily be released from the rescue system we were tied into. The sled and skiis were released and the skier hauled out. The sled and. Not sure hauling a sled out rigged with long sections of rigid plastic pipe would be easier than a rope. Either way its tough getting out of a crevasse so….stay out of them!!.
Another issue I’m sure you will appreciate is simplicity. Looking at your design it seems fraught with many “nuts and bolts”, thus the possibility of breakdowns and the need to carry repair pieces may cause some issues. A rope simply connected to the point of a sled with two carabiners is about as simple as it gets.
Anyway some food for thought. A rigid system has its place and application. Thus on Denali where a well worn sled highway exists, it may work fine. But all the hard work of hauling a sleds for days upon days is one reason why I don’t do expeditions anymore. Its hard work and takes about a week for a body to get used to the effort needed.
39 Days to go!! Yesterday the army lifted the Park Service Base station on to the K. Glacier of Denali. Looking forward to following your trip.
Hi Lou,
The systems look pretty good. I would keep my sled waist belt seperate from my pack waist belt. You put the sled waist belt on first then the pack waist belt goes under the sled waist belt. Sounds complicated, It is not complicated. I don’t want to be changing my sled system on Denali it may get cool or breezy and your fingers may suffer.
I never use the brake system on sleds with the drag rope for fear it might catch on something and I want the sled to track smoothly even on the downhills just tell Jordan it’s really important to stay ahead of your sled because when the sled passes you you’re life is going to get really exciting, lots of fun!
I see the advantages of a rope haul, but maintain that the rigid system is much better if you’re on skis in terrain where you’re probably not going to fall in a crevasse (the Kahiltna highway). Beauty of our system is we have both. We can remove our rods and use rope any time we feel like it.
As for the drop brake, we can rig those and know about them, but with the rigid rods you don’t always need them.
This isn’t my first rodeo by the way… but your feedback is awesome and we study everything you guys suggest, so thanks!
As for simplicity, our design is really quite simple, the nuts and bolts are mostly so things can be taken apart as needed (could have welded a lot more of it together).
Ron, from experience as well as recent testing, I’d say there are as many pros as cons to having a separate harness for the sled. We opted for simplicity with this system, but we can always take the pack belt out and use it, if we want to haul our pack on the sled, and we also have our climbing harnesses. Oh, almost forgot, I think at least one of us might be using the waist harness system.
You should try our system, it’s amazingly efficient compared to anything else I’ve ever used. One of the best things is that the pack keeps the haul aligned perfectly for your body. I don’t know about you, but every time I haul a sled with a waist harness I’m constantly fiddling to get it comfortable, and the rod ends put a lot of pressure on the sides of my hips. Having it attached to the pack in line with the pack’s waist belt is super ergonomic and keeps the rods away from your body…
I should add that the guys using this system are incredibly fit, strong skiers. They can handle it.
Matt, the theory is we’ll all be somewhat used to sled hauling before we even get up there, through training. We’ve been doing some hauling in the field, and also developed some gym exercises that simulate a brutal sled haul. Biggest issue is probably going to be me, but I know these guys will help me out so I’m not worried.
Rigid traces are definitely better for skiing. I’m a fan of the Mountainsmith brake and rudder system. The brake flaps let you rest easily when going up hill. When you drop the skeg, it really helps with tracking on side hills. I’ve used NotWax to reduce drag too. Swix F4 paste (or similar) might be worth trying.
At the end of the day, it’s hard to take all the suck out of pulling a sled … but this is definitely a clever and creative effort… and it sure beats the alternative.
I enjoy looking at your modifications and creative tinkering. Amazing.
The caveat to the system we used was that the rope, plastic modified sled and hardware weighed about 2-3 pds. Seems like you are installing some pretty beefy hardware once you start poaching parts off a snowmachine.
Do you have a weight on that sled set-up? Not that it matters as you seem pretty set with what you got but I know how you just love weight comparisons. Throw in a sat phone and you look to be individually hauling about 75-80 pds total each. ?? How much weight in the sled? Curious. What gear in the sled?
I found that pulling a sled day after day was a little bit of fitness and whole lot of mental toughness and focus.
I am impressed by your creativity and shop skills.
Just to let folks know 10 years ago the system I used on Denali was 2x 1 inch PVC pipe attached to gear loops on harness with a small bungee. Pipes were crossed in an X with a small piece of 4mm holding them together. Everyone was complaining about how their sleds pendulemend (sp) going around Windy corner. Ours tracked perfectly. Skied down from 14K with fun turns and no problem with the sled. Added a loop of webbing around sled as a brake to go down motorcycle hill but it was overkill, the pipes did their job.
Will be using same system this year but probably waxing the base of the sled. Have a friend who is thinking of adding old pieces of climbing skins to his sled to prevent it from sliding backwards when stopping on a climb. Interesting experiment IMO.
very similar to the setup here http://skipulk.com/ he’s got a removable fin that addresses the sidehill wash-out too. I’ve got his one-piece pole set up, made my own hip belt and installed a mountainshith style “flap brake” on a Paris Expedition sled – final set up works well – I really like the flap-style brake at the rear for long uphills for the rest factor w/out the sled pulling you back down the grade
I second the use of the flap brake system. I put one on my Mountainsmith sled years ago.( A aluminum highway mileage marker sign,cut in half ,works perfectly!) It really takes a load off your hips as you catch your breath on the long,uphill slogs.
Hey Chris, you should know that while the (hurumph Lou) 75L Dyneema packs do cost as much as a dinner and drinks for the WildSnow Denali team, CiloGear does make the same pack out of affordable materials. It’s not a ton heavier, yet it is close to a ton cheaper… :whistle:
Sorry Graham, fixed it. He’s right, the non-dynema 75 liter worksack (which still uses some pretty high tech fabrics) only costs $375, pretty much the same as most of the other 75 liter packs out there.
I’ve been to Logan and Foraker and used kiddie sleds tethered to packs with a rear prussik and a knotted rope brake. I’ve used stayed setups as well (not as well executed as yours) and of course they work much better going downhill and a little better on sidehills. Thing is, the Kahiltna is the ideal pulking terrain because it really is mostly gradual uphill. And we got our sleds on the Kahiltna, because the pilots bring them in bunches and use them to mark the runway. Have you guys considered the airplane space your sleds will take?
“bill April 22nd, 2010 10:31 am
I have done a bit of sled hauling, and find that they work great in the flats and ok on gradual slopes. Steep sidehills are the worst”
Using a paris pulk by chance?
http://kaasin.no/2007/10/31/fullrigget-paris-pulk/
Guess you find it easier to controll/pull the pulk attached to the pack and not the hip belt?
Time to mod the Bora 80 I guess :heart:
Best wishes from Norway
Back in the day, before the Talkeetna pilots rented/sold the kiddie sleds we would put our big packs in the sleds and tie them in for shipping on the airlines. The best part of doing this was that the pack staps, etc.. where well protected. But, I wonder what the TSA would say about this method. :pinch:
Wonder if you rigged a ski instead of a wheel on an extra Dynafit binding. It might hold side hauls better than a flat sled?
Jim, the sleds actually do have skegs of various sorts. The wider sleds by http://www.wildernessengineering.com/ are actually quite good on sidehills, but still too tippy when loaded with much. I’m not sure there is a viable sled solution, and again, I’d say that with modern gear and careful planning, it’s getting to the point where it is probably better to forget the sleds above 11,500 feet on the Denali West Buttress route.
Thank you for the informative post. Inspired by it, I created a pulk of my own and used it on a recent hut trip that was pretty straight forward in terms of terrain. It also seems that my BD Anarchist pack was built with tabs for pulling a sled 🙂 I’m considering its use for a Goodwin Greene approach out of Express Creek in a couple weeks and I’m wondering if this is suitable terrain for a ski pulk. My worry area is the potential need for kick turns and or negotiating steep or icy terrain. I’ve gone over Pearl Pass a few times and I would not consider the sled for that terrain but this will be my first visit to Goodwin Greene. Opinions welcomed! Thank you for any assistance you may provide.
Hi all,
I am using the skipulk.com on longer small hill approach to remote ice climbs and love it. I always wonder if / how I would get out of it in a crevasse situation (never used on glacier yet)
May someone please send me picture on the Mountainsmith brake and rudder system?
I made my own aluminium fin rudder at the back but Im curious to see the brake system you guys talked about here (other the the top knot drag)…
Thanks!
Sebastian, I should have updated this post a long time ago. My mods mostly worked but the heim joints were too small and broke, I since changed to beefier heim joints and the sled was used for another major Alaskan slog-pedition with no problems. Lou
Comments are closed.