Thanks to Dynafit for sponsoring this Tech Tip. They’re psyched to make sure people are in the right gear and know how to use it.

Excluding skis, poles and clothing worn, the total weight of this kit is 3700g without rope and Billy Goat plates, and 5100g with.
Light and efficient packs, avy gear, ropes and more
By Teague Holmes
What are we after out there on skis? Would we take a few more blissful descents each day if given more time and energy? It takes some effort to ski lap after lap and shred comfortably and strong all day long. Dialing in our systems while building our skills and fitness is half the fun. Shedding deadweight and improving packing systems to save time and energy, leads to more powder skiing and an even easier, safer and more comfortable experiences in the mountains.
As an athlete who spends the majority of my time moving through mountains no matter the season, I’ve been very intentional about dialing in my kit. Whether I’m heading out for the Core of The Gore Tour, into the Elk Mountains for the Double Bells Day tour, hitting the Teton Trifecta or a couple laps on Mt Moran in a day, I’ve worked to keep my pack light so that I have energy to ski hard on solid powder skis all day long. The pack contents change a little depending on whether I’m skiing deep in the ranges midwinter in Colorado or technical spring lines in the Tetons. This particular line up is geared toward inter-continental winter skiing.
The pack
Whether a pack weighs under 1000g or over 2000g, its job is essentially the same: carry what we need out there (unless it’s an airbag, which is a whole other conversation). Give me a sub 1000g, 28L bucket with a roll top and ski carry and I’m 90% set. If there are great packs weighing in at 1000g or less, all the other fatties must have extra heft in the form of fancy pockets, zippers, buckles, and straps. Trade all the extras for your own organized packing system.
One main compartment, one small zipper pouch and a thin simple sleeve for internal shovel and probe, a ski and ice axe carry (side note: in Chamonix most freeriders/mountaineers carry their axe internally), and a small hole for your rope to feed out from behind your shovel. That’s it. Other features are extra gadgets to sell to shops and those who want to faff around with complicated however thoughtful bells and whistles.
I like to avoid zippers for the main closure because of repeated use, and if a main zipper fails, the pack is useless. However a side/body zip option is nice and less likely to fail since it’s generally relied on less. My go-to for general ski mountaineering/freeride is the skier-designed Black Crows Dorsa 27. I’ve stripped off the few extra buckles and patches but it was pretty clean to start. The roll top, full length vertical access zipper, simple light sleeves for rescue equipment and single-compartment design is perfect. If I would desire one change only, I wish it was made of an even lighter fabric to come in under its already minimal threshold of 1000g.
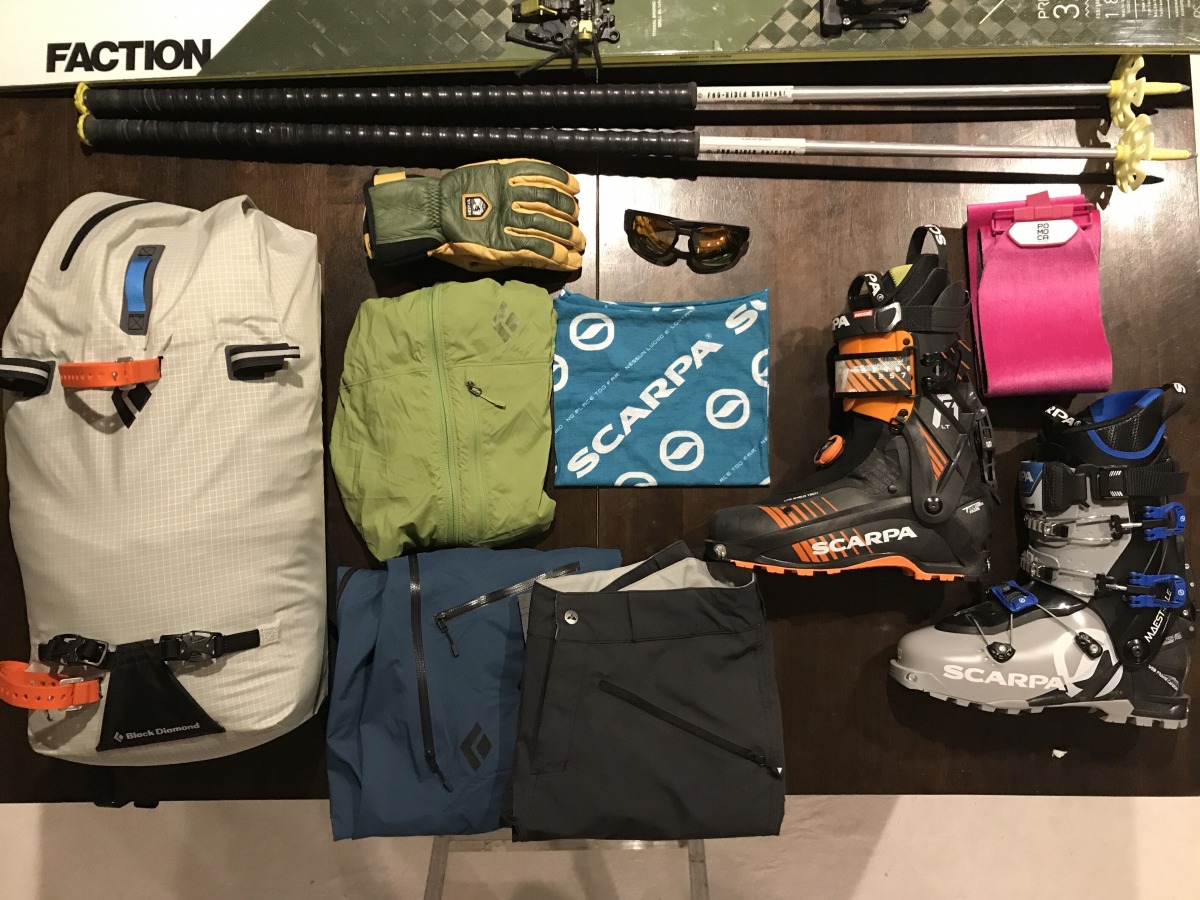
All gear in the first image (including rope and Billy Goats) packed with boot and second layer options at the ready.
When I need to go lighter but with more volume, I use a stripped down North Face Phantom 38. This well designed mountain pack comes in at around 1000 grams stock but can get down to a svelte 775g without the lid, and some straps that I stripped. I replaced the plastic frame with a light, blue foam back pad. I am also currently in the process of frankenstein modding a Black Diamond Blitz Pack. It’s stock at 444 grams. I had a simple rescue equipment sleeve sewn in and am adding a diagonal ski carry similar to the Arc’teryx Alpha SK 32 (another well designed touring pack option). When I am through with the mods, the Blitz should weigh in barely over a pound and be highly functional. Just for perspective The Osprey Kamber 32 comes in at 1600g. That’s 600 grams heavier than the heaviest pack that I feel is reasonable. Use your experience and intentional strategic packing to replace those extra pockets, bells and whistles. I’ll be on the next powder lap feeling light and free to jump and play with everything I need packed neatly in my sub two pound rucksack. Less pounds, more powder.
Avalanche Rescue Gear
In ranges with deep snowpack I always carry a durable carbon probe, 300cm minimum. I prefer the Backcountry Access Stealth 300 Carbon Avalanche Probe for durability, length and weight. Avalanche shovels are not the place to save weight. Many shovels on the market have been shown to fold and deform in real avalanche debris digging tests. Be sure your shovel is at least UIAA tested and is heavy and durable. If your partner has a small, light, flimsy shovel, take it and give them your solid heavy duty shovel. Ask your local forecasters about their favorite shovels or read WildSnow’s top picks. I prefer the time tested Voile Telepro.
A good snow saw is a crucial tool to the avid backcountry skier. In my opinion, the very best saw out there is the Primo Snow and Avalanche ‘El Professional’. We need to make our pit tests consistent and repeatable, not to mention if your saw is light you are more likely to carry and therefore use it. Persistent weak layers are typically spatially consistent so digging is the only way to truly verify their existence or not. Carry a light functional saw and dial in the ‘7 min test pit’ to step up your snowpack data consumption. Many saws on the market that I have seen are bulky, heavy and overdone, expensive or flimsy. I am sure there are some other new options out there though, so dig in.
For my regular test pit cord I use a simple 8’, 3mm accessory cord with knots tied in it. It works perfectly, is cheap, very light and can be used to tie up a splint or add to a makeshift sled or equipment repair. Those heavy and expensive cornice saws with metal teeth will destroy your and your partners probe poles when you isolate your CT and ECT test columns.
Ropes and ascent plates
You can save a LOT of weight and bulk here. I like to carry a rope to cut cornices and perform roped ski cuts to test or mitigate storm snow instability. My favorite is the 30m Petzl RAD Line. This is a very unique 6mm rope that handles like an 8mm. It is a hyperstatic cord, ultra-light and compact, designed for skiers doing crevasse rescue, rappelling rock bands or roping up on a glacier. RAD Lines are literally half the weight of the old style 7 or 8mm ropes that were still popular up until maybe 2016. That’s 22 grams per meter vs 44 grams per meter or 1.32 KG vs 2.64 KG. That’s a 2.9lb savings – huge! It’s easier to handle than a traditional static line due to it being made from the highly modulus Spectra or Dyneema. At half the weight and bulk just think how nice your pack will feel on your eighth joyous powder lap in Little Cottonwood canyon or committed on Glacier Peak deep in the Beartooths.
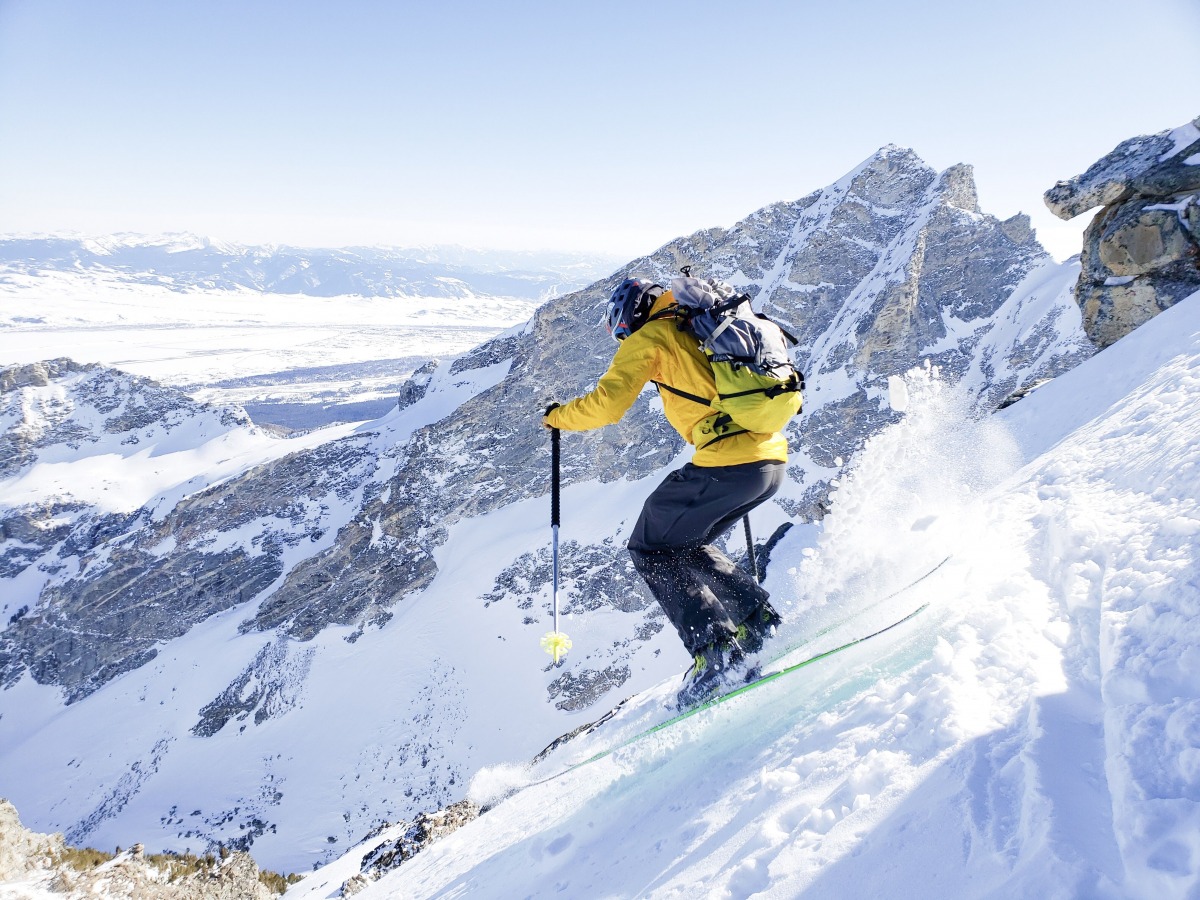
Couloirs in the Tetons are ideal territory for the Billy Goat plates. Here, the author in Teton National Park. Photo: Jason Killgore
RAD stands for Rescue And Descent. It is NOT a dynamic rope and not meant for technical steep rock climbing where a dynamic catch is needed. Given it’s small diameter and light weight the RAD line still has a relatively high breaking strength of 12kN. It is of note that this 12kN strength is dropped to about 6kN as soon as a knot is tied in the line. That’s still plenty strong for non dynamic loading activities such as rappelling. These cords are all the rage in Chamonix and the Tetons.
The RAD system does requires very specific tools and techniques to work properly and the right belay devices and carabiners are crucial to safe use of these very thin ropes. Also, because the RAD line is quite thin, it’s smart to use an extended rappel and auto block back up leash system. Sometimes I opt for a 60 meter rope instead, especially if I’m heading into big terrain where I know I might need a longer line to get into start zones or to reach real safe zones.
When it’s steep and deep I carry Billy Goat Technologies Ascent Plates, also known as adult snowshoes, which affix to your ski boot with crampons. These are big in the Tetons where steep, powder filled couloirs require beastly wallowing, a bazillion kick turns, postholing, or ascent plates. In the Wasatch where you often do not need crampons mid winter, you can get by with the plastic version called Verts. The Billy Goat Plates provide the advantage of durability on rock with a crampon for security on ice or hard snow. Also they fit flat in your pack.
Navigation
CalTopo is the go-to. New high resolution slope shading via Lidar in many locations, and weekly snowpack imaging via Sentinal make CalTopo, and their new app, a game changer this winter. CAIC’s Colorado Avalanche Workshop actually just included a presentation on this exact topic. Don’t forget to keep a small lipstick size auxiliary battery to recharge your crucial emergency and mapping device a.k.a phone. I do not carry a map on day trips in reasonably familiar zones. Sometimes I will in other countries or if my mapping system does not cover the area in high resolution or on an expedition with a basecamp. This is only if my partner and or partners also have a fully charged phone, CalTopo mapping app and their own auxiliary battery and cord.
My team also carries a two-way texting compatible GPS rescue communication and navigation device like the Garmin InReach and the studied knowledge to use all this technology.
Emergency/Safety Equipment
There’s a lot to be said here, but my basics include: repair, first aid, rescue and comfort kit
Repair
Small tools and any parts specific to your own skis boots and bindings such as a buckle or cord. A big Leatherman multi tool is usually overkill and adds to dead weight. The Leatherman Mini Juice with pliers, not scissors, is handy and light. I carry a ski pole splint made from cut/halved ski poles or my preference of two cut pieces of corrugated rain gutter and small zip ties. The pliable rain gutter steel can be wrapped around any diameter pole and even those adjustable aka breakable poles many folks like to use. A fixed length non adjustable pole is hands down my preference over a heavier prone to failure adjustable option. At least 2 voile straps and large zip ties or an 11” hose clamp to afix a boot to a ski in the likely event of a broken binding. A half roll of athletic tape and some duct tape.
First Aid and rescue
Removable incorporated back pad foam sleeping pad for insulating from the ground in the event of an unexpected stop of duration, splint or padding. Compression/cling wrap, heavy bleeding gauze/sanitary napkin. Chemical toe warmers and hand/mega warm pack to stick unter armpits and groin if hypothermia is impending. Lighter, and whistle. Consider small fire-starter/vaseline cotton balls. Consider a more durable than a space blanket Space Bag for two. Or a thin ultralight nylon tarp. Ultra light usb rechargeable headlamp.
I highly recommend very strong pain meds, (schedule an appointment with your doctor for an appropriate small prescription and safe recommendations of how to use acetaminophen/ ibuprofen combo. 3 mill. 30’ cornice saw cord (all cord no teeth) or some extra cord and drill to make a sled out of skis. This takes practice. SAM splint, or skip it and can use the foam pad with your snow saw to add rigidity for a splint. Garmin In-Reach (two way texting is far superior to a simple SOS spot). Small auxiliary battery to recharge cell phone and phone/device cord. Two of these per group. This is huge. Keep them charged and test once a week.
Comfort and extra warmth
I carry my “get out of jail free card” Pain meds, 100 or 200 extra calories in a gel or bar, and caffeine. This can help get through that late day injury or bonk to make the last 3 hr trek back to civilization. Ginger chews are my secret weapon when the day gets long. Find your own light simple treat to keep at the ready for a mental boost.
I keep either a pair of ultra light puffy pants if it’s really cold and we’ll be going deep into the range, or, puffy shorts or zip on long underwear like Northern Playground’s full zip Knickers. These are great for those early morning valley inversions or unexpected cloud cover too. Take em off and on without taking off boots or skis.
My combo of accessory layers add plenty of adjustable comfort and margin for warmth. If the ridgetop winds pick up I always say that putting on a hood, buff and goggles is like going inside. The Julbo Aerospace sports a snap out lense that hovers just off the frame rendering fogging up a thing of the past. I carry two pair of gloves minimum. One lighter or mid weight pair for the ascents and dexterity tasks as well as a very warm pair of gloves or mitts if the others get wet in a snow pit or when the sun goes down or winds pick up. I absolutely prefer leather. The Hestra Ergo Grip Incline and Freeride C-Zone mitt are my first choices.
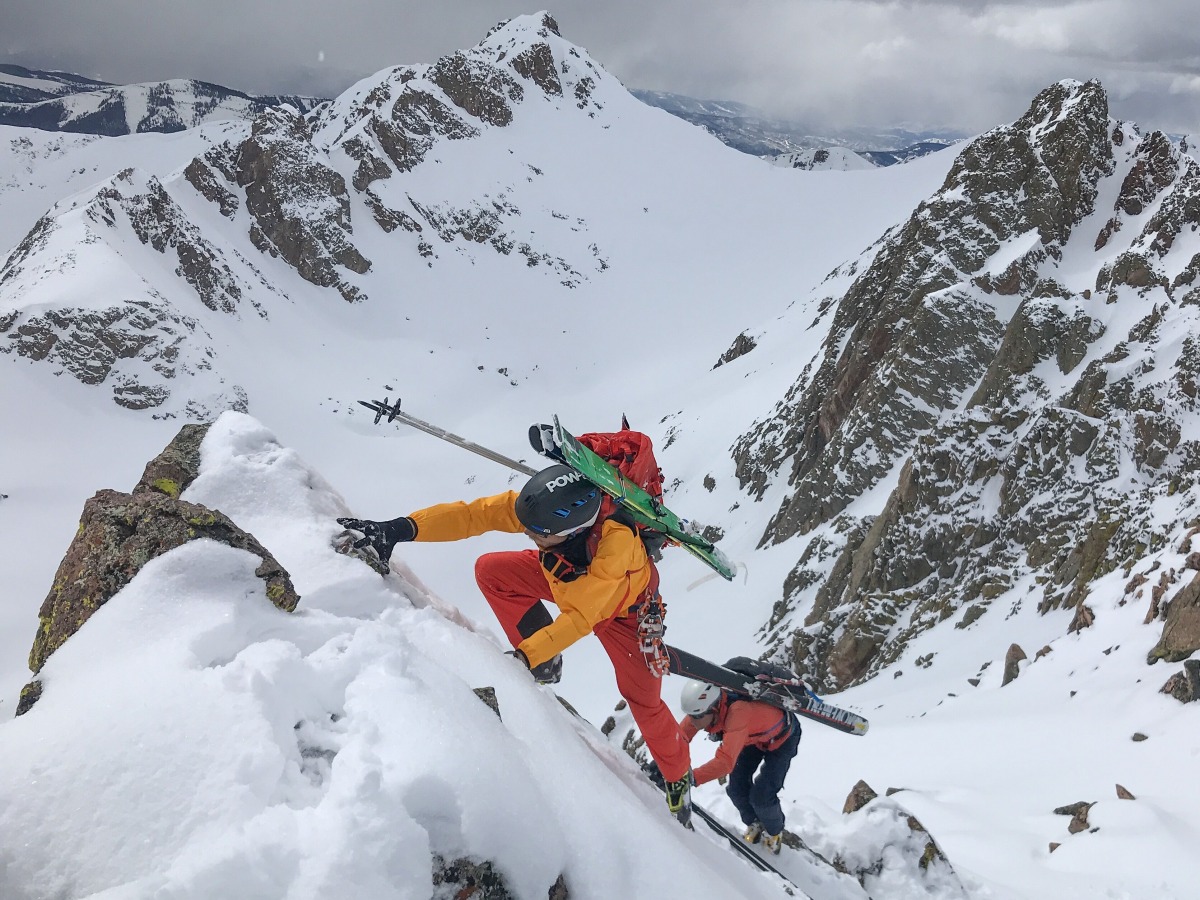
Jason Killgore and Chris Baldwin completing the Precipitation Peaks Tour in the Gore Range, skiing lines rain, sleet, hail, and snow from Silverthorne to Vail. Photo: Teague Holmes
What’s on your back and staying dry: layers and breathable fabrics
Do you enjoy arriving at the top of the skin track dry and comfortable? Me too. Gary Smith offered a full take on layering back in January, but here’s my take on a few essential layering concepts guaranteed to keep you dry and warm.
Breathability is the priority for dry and warm comfort so I look for fabrics that are “air permeable” “four-way stretch woven” “one layer kinit” and avoid “membranes” and “hard shells” during winter in the Central Rockies. My clothing strategy is simple: light and thin is dry, and just warm enough, and always have “effort layers” to “wear”. We’re going to generate heat on the ascent and I think of that effort as a layer. Light effort, medium effort, strong effort and I am able to factor these layers into the actual fabric layers I wear. I may anticipate touring at a strong effort and that effort-layer will keep me warm, or perhaps I’ll be going easy and getting the ropes out and may need to put on a second actual layering piece sooner. Consider weather forecast, the route’s exposure and your team’s intent. Are you out to get a lot of quality skiing in or perhaps chill and enjoy a summit lunch?
No matter the effort or winter temps my base layer remains the same ultra light and breathable zip neck long sleeve. We aren’t going to take it off so it needs to be thin for me to stay dry throughout the tour. If I do get damp, it’s able to completely dry out along the way under the single layer breathable second piece. My layering system goes, ultra light base layer, transceiver, preferred second layer ultra-light single layer soft shell or synthetic puffy, and a down puffy if we stop for more than a few minutes. Remove in reverse order before sweating in anticipation of warming up. With this system I generally never have to remove a layer to put another one on or remove my pack more than once per lap. With the “pirates code” in practice my best partners won’t wait for that kind of faffing around as they are rolling on heading for more face shots. If you are changing layers or getting real damp perhaps your first two layers are thicker and less breathable than you think. Maybe try something lighter and without any membrane to see. The dryer and more comfortable, the less one stops to adjust, the less temperature fluctuation. Consistent movement leads to a more efficient effort and easy dry comfortable laps all day long. And naturally, more powder.
Other tips for weight savings
Iconic American Alpinist Steve House once said of moving in the mountains, “The simpler we make things, the richer the experience becomes.” It’s easy for any human powered mountain athlete to agree that lighter is better, IF, the functionality is there. Lighter is safer on your legs, back and knees.
Go through each piece of equipment and clothing, remove extra stuff sacks, lengths of straps, and “comforts of home” items. Reduce weight by ditching metal or heavy water bottles with light and compressible hydro flasks or even reuse compressible lightweight Gatorade bottles. Ditch hard shells and Gore-tex unless it’s nuking and above freezing. Weigh everything. If you take a complete inventory approach, it will add up to many pounds. If you look at any piece of equipment and think ahh, weight weenies, I’m tough and won’t notice a couple hundred grams, you’re likely to end up with a pack full of extra pounds. Look at what you have been carrying. How often have you used it in the field? Would you rather have it “just in case” you hang out, or would you rather ski?
More skiing equals even more skiing. The fitness adaptations compound over time. More miles of powder lead to improved endurance, skill and enjoyment. Trade deadweight on your back for ease on the skintrack. Ditch or replace extra overdone items for experience and forethought to dial in exactly what you need and you will be the well prepared local crusher, floating up and down on powder skis tracking out the lines with ease before the heavy, albeit tough guys, even get there. Welcome to a whole new definition of a “day tour”!
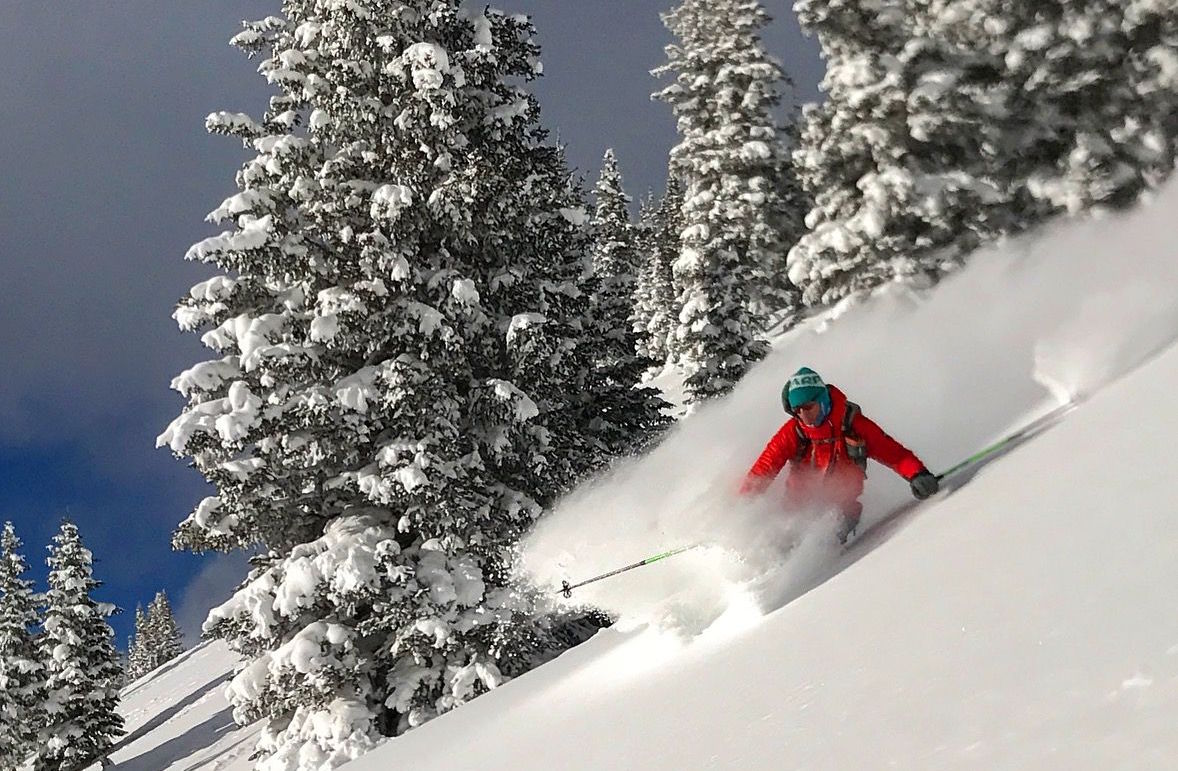
Less weight equal more powder! Teague gets another lap at home in Colorado. Photo: Chris Baldwin
Teague Holmes competed on the US Ski Mountaineering Team 2015-2018, is a nine-time Elk Mountain Grand Traverse Finisher, and once skied Mount Rainier’s Liberty Ridge in under 24 hours, starting from his home in Breckenridge. See more on his website.
Beyond our regular guest bloggers who have their own profiles, some of our one-timers end up being categorized under this generic profile. Once they do a few posts, we build a category. In any case, we sure appreciate ALL the WildSnow guest bloggers!