Thanks to publishing partner Cripple Creek Backcountry for publishing this post. Yep, they sell splitboards, too.

In firm snow, or in an exposed spot, make sure you firmly plant your ski/board so that you don’t lose it to gravity. Half of a my splitboard sliding down the slope might be one of my worst fears.
Tips for faster, more efficient splitboard transitions
So you’ve decided to commit to the splitboard as a backcountry tool. You have undoubtedly received unnecessary grief from all of your potential BC partners, and probably from folks who you’d never think of skiing with anyways. Take the flack with a light heart, and certainly don’t be discouraged. There is hope!
Splitboarding is an incredible tool to access the backcountry, but it comes with numerous considerations as a mode of travel. I won’t dive into the nuances of route selection and inherent biases in terrain choices that come with a splitboard. Instead, I hope to shed some light on how you can enjoy that extra sip of hot tea and a snack while you wait for your two-plank friends to forget to lock their boots for the fun part.
Practice
There is no excuse for a lack of understanding of your equipment. Practice going from downhill ride mode to uphill travel mode and vice versa:
Stepping out of your bindings, removing your bindings, splitting your board, putting on your bindings, applying skins, lengthening your ski poles.
Got it? Practicing in your living room has its merits, but it certainly won’t prepare you for the various types of snow and ice that work into every little nook and cranny of your inside edges and interfaces. Practice transitions in the snow, at a ski area, in your backyard if you’re fortunate enough to live in the snow. Practice, practice, and more practice.

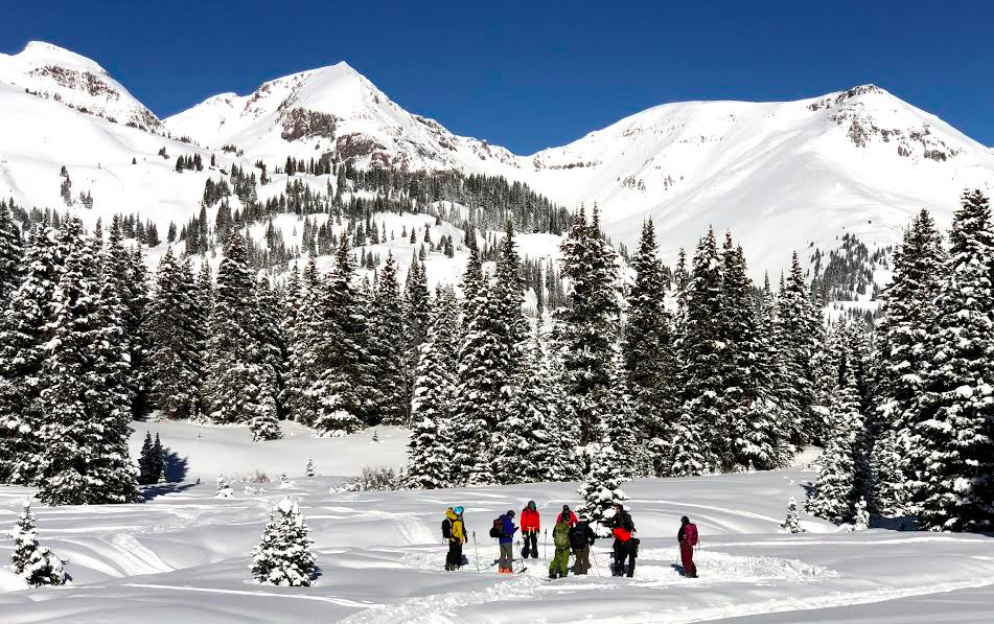
Teaching an all splitboard level 1 avalanche course. I’ll often spend a whole tour day just in split mode to get students thinking like splitboarders in the backcountry – being dialed at your transitions is not just for efficiency, but can be a major safety consideration. It can also expand your ability to move around the terrain effectively.
Develop a system
Your splitboard is only a portion of the transition process from uphill travel to downhill ripping. There’s food to eat, water to drink, layers to put on, gloves to swap out, goggles to de-fog, insta-stories to curate, and the list goes on. Everyone tends to be a bit more patient at the bottom of the run before going up for another. The patience dwindles at the top as everyone is frothing for a faceshot.
Figure out what parts of your transition are necessary and which parts you can cut out. For example – do you need goggles for this run? (hopefully!) Do you need to swap your thinner gloves for the thicker ones? Can you keep the lightweight shell on, or do you need to add a layer? I find that this can change based on the conditions. Anticipate what that will look like at the top or bottom of your run.

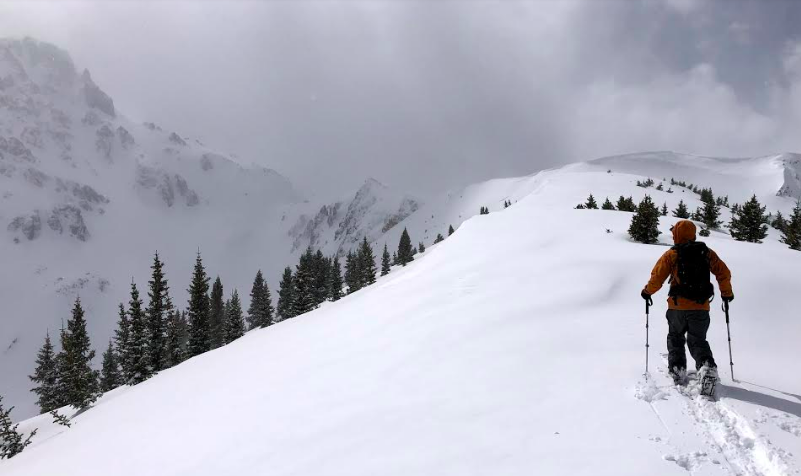
Skinning out on a snowy ridge with a transition looming. This is a good example of pausing before breaking out of the treeline to add layers, etc.
Here’s a typical flow for my transitions:
1) High five your partners (or don’t because you just barely and safely beat them to the top)
2) Stomp out and work harden a platform if it’s deep!
3) Add a layer and get your thicker gloves on – trap the warmth you just built up!
4) Swap out hat and glasses for helmet/beanie and goggles
5) Step out of your skis and remove bindings – try and keep them off the snow on your pack
6) Rip off skins and fold them in half glue to glue – take care to keep the snow off the glue
7) Clear snow/ice from the inside edges and around the interface components
8) Put your split-skis together and lock your bindings on to your board
9) Collapse poles? Depends on the terrain.
10) After everyone is transitioned – discuss the plan!
Reverse these steps in some form or another for the uphill transition, which I find to go much more quickly. This may seem like a lot of steps for each lap in the backcountry, but practice will make this come together efficiently.
Tips for transition efficiency
· Consider your layering system – the age old “be bold start cold” is okay. Start warm stay warm, not sweaty.
· Keep your poles extended for the descent – especially for short laps in mellow terrain or where flat spots exist.
· Angle your top sheets to the sun while you deal with other gear. This will make the de-icing much easier. Carry a small scraper for when your board is frozen in carbonite.
· If you’re transitioning on a windy ridgetop, a short break in a sheltered area to discuss the plan, add layers, and take care of everything except ripping skins can make for efficiency in the long run.
· Have a place for everything. For me; skins in the avy tool pocket, sunglasses in the goggle pocket, water easy to access on the side, etc.
· Unlock bindings, tip/tail clips, and board clips at the same time – then split (make sure nothing is going downhill unattended).
· Anticipate and practice!

It’s good not to feel rushed in the backcountry while on a tour, but it’s important to be able to respond and adapt to urgency when needed.
When it comes to being able to transition quickly and efficiently it can be as simple as keeping your ski partners happy and stoked, and as serious as being able to respond to an emergency (ie: avalanche event on the uptrack). There are too many variables involved in backcountry travel to name here, but each of us can control what we can. Just like your ability to be dialed with your avalanche rescue gear, you can be equally as dialed with your transitions on your splitboard.
A call out to all the splitboarders; what makes your backcountry day go as smoothly as possible?
Jonathan Cooper is WildSnow’s resident splitboard correspondent. See more WildSnow splitboard coverage here.

Jonathan Cooper (“Coop”) grew up in the Pacific Northwest and has been playing in the mountains since he was a teen. This was about the same time he made the fateful decision to strap a snowboard to his feet, which has led to a lifelong pursuit of powdery turns. Professionally speaking, he has been working as a ski guide, avalanche educator, and in emergency medicine for over a decade. During the winter months he can be found chasing snow, and passing on his passion for education and the backcountry through teaching avalanche courses for numerous providers in southwest Colorado, and the Pacific Northwest. Similarly, his passion for wilderness medicine has led him to teach for Desert Mountain Medicine all over the West. If you’re interested, you can find a course through Mountain Trip and Mountain West Rescue. In the end, all of this experience has merely been training for his contributions to the almighty WildSnow.com.
18 comments
I’m with Jonathan in that I do my transitions in the same order every time, so it becomes a practiced, efficient routine and not something I have to think about when I’m tired, cold, etc. As I’m nearing the top a of a climb, I find myself mentally rehearsing the steps I know I’ll take the moment I stop. In general I like to tour with partners who have similar objectives for speed and efficiency as I do, regardless of their preferred tool of descent. That said, I secretly enjoy being the quickest, especially when I can joke about “always having to wait around for you skiers!”
Great post. A hardboot setup with good transitions and solid split ski ability can make it so a splitboarder can keep up with anyone short of a skimo racer.
A couple things I found helpful that were not mentioned.
1. I find keeping a ice clipper on my waist strap is helpful for areas where I might switch to ski mode without putting skins on and then back again, easy to put the phantoms right on there.
2. I purchased a skimo style water bottle holder that goes on my shoulder strap from Camp USA that makes it much easier to drink on the up track so I’m not only drinking at transitions.
3. I put a sticker on the toe bail of my front phantom binding so I don’t have to look at the cant blocks to see which bindings is which.
4. I cut skimo style notches in the tail of my split then epoxied them so I don’t have to use crappy splitboard tail clips.
Not a splitboarder, however, I’ve (tried) to make it hard policy to only have avy gear in my avy tool pocket as if there’s an actual avy situation and things get, um, “rushed” (to put it lightly), there’s nothing excessive in the avy tool pocket to get in the way and/or lose in the midst of a rescue situation. Would be a bummer to have tossed one’s skins out of the pocket to get to the probe and shovel only to have to search for them in the midst of an evac situation.
Christian, thanks for posting. I think your point is valid for keeping the avy pocket a sacred space. I have been practicing gear deployment with various configurations. I have been only finding issues getting my shovel blade back into the pocket, but not out. That being said, I think it’s important to always hedge the bets in your favor.
While I stopped worrying about trying to win transitioning many seasons ago, this is my basic approach to being as efficient as possible when topping out.
Stomp out snow (if necessary)
Use pole handle to undo binding ratchet straps without bending down
Step out of bindings
Collapse poles set aside
Pick up boards
Turn board hooks
Switch high backs to ride mode
Take off bindings, set aside
pull skins, put in jacket (prefered) or in storage sack in pack
Connect board halves
Attach bindings
Carry collapsed poles in hand
Descend
When preparing to ascend again
Extend poles
Try to compact snow (as much as possible)
Use pole handle to undo binding ratchet straps without bending down
Step out of bindings (TIP remain on top of board to help compact snow)
Step off, pick up board
Switch high backs to walk mode
Slide off front binding and attach to touring bracket
Separate board halves attach rear binding to tour bracket
Turn board hooks and put on skins
Ascend
Great article thanks it will be useful for my up coming trip
You had me up until “insta-stories to curate”. So sick of social media being a focus of people in the backcountry, I don’t ride with anyone who is in it “for the gram” and I won’t read any more of your stuff as a result. Keep the backcountry wild, enjoy it and go home, take only memories, leave only skin tracks.
Lighten up
It was a joke 😉
I think a distinction should be made between taking photos and posting to social media. If you’re uploading stuff while you’re out in the BC you may need to chill a bit. I try to carry an actual point and shoot digi camera in the BC (actual whaat!) because it’s more simple to use than a phone and better quality. That way you can keep the posts for post tour when you get home. I’m really bad at taking photos out there, and I also often forget my camera, but I am really appreciative of my touring pals who can capture memories and stoke and do it well. Sorry for the digression. Soft boots4ever man.
Nice one Coop! Good tips in there.
I used to do all hardware things first, and layers/goggles/etc second.
Lately I’ve figured a system I like much better.
1st – do everything I can without taking skis off. Layers, goggles, water, gloves, lock out hardboots, and poles.
2nd – step out, rip skins, assemble, go.
For me, it’s a game changer doing 90% of the transition without wallowing in the snow.
At the bottom, reverse. Ski mode and skins first so I can delayer on top of the snow, not in it.
I don’t go with anyone who isn’t Avi certified, a bro talker, or finds the need to rush up and down the mountain. Why does it need to be a shit talk fest on who isn’t ready? Too much bro in the world of Backcountry these days.
I don’t go with anyone who thinks attending a class gets them “certified.” Too much laziness and imprecision with language in the world of backcountry these days.
A simple tip that helps me is try to only pick up something once. So for example I start my transition by collapsing my poles and they go straight into my pack, instead of setting poles down and handling them a second time later in the transition.
good artical !
I was just pointing out the whole system idea to a friend who was doing something basic on skis that was ok on flat ground but might not go well doing the same thing on a steep, so the premise was to use a system/best practises all the time
this might be important for a split board transistions or clearing a tech binding of snow n ice or even just clicking into your skis at the lodge
The race to get ready may sound weird to people who don’t have ADHD ( a common affliction of adrenaline junkies ) but i found the only way to be ready on time transitioning on skis or paddling a WW kayak was for me to make it into a race, otherwise everbody else is ready to go and I’m standing there wondering what happened
As the first commenter and perhaps inadvertent tone-setter, I’d like to clarify that I carefully chose my words when writing, “In general I like to tour with partners who have similar objectives for speed and efficiency as I do, regardless of their preferred tool of descent.” Sure, I like to be efficient, but most of the time I’m in no way rushing. My partners and I usually strive for an all-day pace (i.e., slow and steady) that allows plenty of oxygen to have a conversation, time to admire the natural beauty around us, and feel grateful for being able to have an beautiful experience in a world with many competing priorities. Quality > quantity.
@ VTVOLK re: all day pace. Yeah, me too. It’s not a race unless you’re causing your partners to freeze on top of a windy ridge, etc.
My primary BC partners are skiers and they love to hassle me about the inherent problems with using a splitboard but it’s all in good fun. Although, I will admit that I’ve gotten wrapped up in conversations during the transition after a descent and inadvertently transitioned from ride mode to skin mode and BACK to ride mode without noticing – more than once even. That warrants more severe teasing!
Love this, I think that efficiency in the backcountry is something that we can all practice.
Comments are closed.