Happy feet make people happy.
5 Tips for better fitting boots
October is here and if the toe nails you lost last season were to come back, they would have done so by now. With your feet healed, it’s time to start thinking about how to take care of them for the upcoming season. There are, after all, millions of steps ahead of you to earn those turns for the way down. Proper boot fitting is a crucial element of your future ski touring comfort and success.
I remember dancing around the store the first time I put on the Dynafit TLT5 and working a whole day with boots on my feet. I would proudly take the bus to and from skiing without even bringing a second pair of shoes. It turns out, I should have paid attention to the slight rubbing that over a season of irresponsible neglect resulted in a small clone of myself budding out of my ankle bone. That clone is a major impingement to fitting any new boots I ski in today.
Don’t make the same mistake I did. Here, five tips gathered over a dozen years of boot fitting and learning the slow way how to prevent ski touring pain with great fitting boots.
1. Understand how a touring boot should fit
There is a big range of “best practices” for fitting a touring boot. I worked as an alpine boot fitter before specializing in touring boots and, wow, was that first year a learning experience. The resort boot world focuses on downhill performance. Ski tourers, on the other hand, don’t appreciate having their feet intransigently cast into a hard plastic shell. Some wiggle room between fitting modes is needed.
A ski shop will usually employ the primitive practice of shell fitting if a boot fitter’s x-ray vision is not working the day of your visit. The goal is to make sure there will be enough room around the toes, without leaving the heel swimming. After taking the liner out and pushing your toes gently to the front of the boot it is then possible to check the space behind the heel. Boot fitters typically use a fit stick, but if you are trying this at home and don’t have such sophistication, use two fingers stacked on top of eachother or roughly 1.5 – 2 cm of space. For performance fits, this spacing goes to 1 cm or pretty much as tight as a skier can handle.
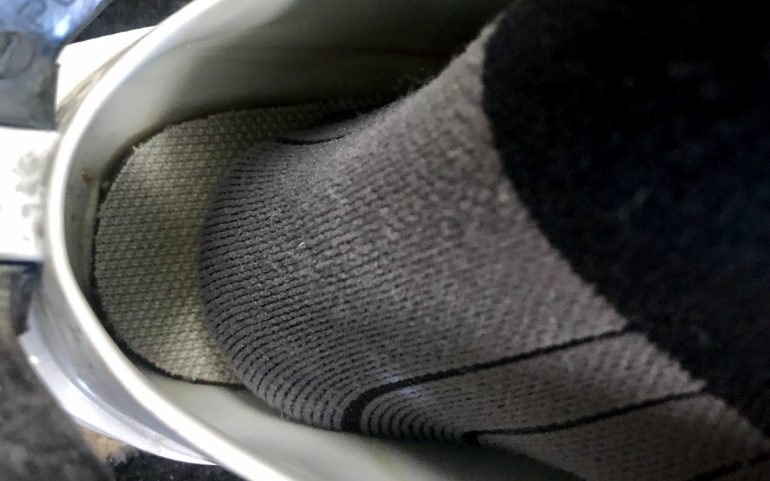
A shell fit with a generous two fingers of room.
The comfort touring world is significantly different and allows for a full 2 cm fit or in select cases a bit more. But be careful, a boot that is too big (anything much more than two fingers) is sure to create rubbing and eventual blisters. I still fit my touring boots as aggressively tight as my old 130 flex alpine boots that thankfully haven’t been worn in years. I feel helplessly out of control if I properly size my boots so I always gone down. However, I once entered the Grand Traverse last minute and raced 40 miles on a pair of borrowed boots a full size up from my normal race boots; it was the best that a pair of boots ever fit. In the end, comfort versus performance need not be a trade off. You can make a very tight performance fit very comfortable and a roomier ski boot more responsive, just expect to spend extra time dialing them in.
2. Customize your boots to your feet
Custom ski boots are no longer just for the rich and famous. There are three component parts to the boot that can be easily customized for your ski touring enjoyment.
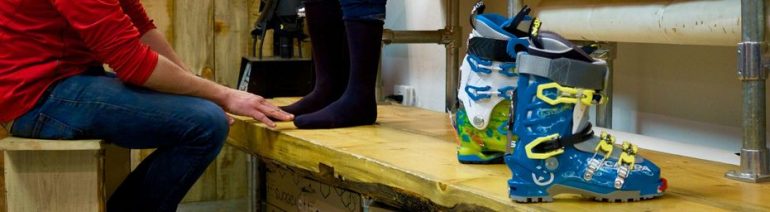
Know your feet before you consult and expert or DIY your next boot fit.
Liners
Nearly every brand has their own proprietary thermo-moldable liner although some definitely work better than others. Sometimes the improvement of these liners comes at the cost of that immediate out-of-the-box fit. When trying on boots for the first time in the store, remember that this is the tightest a boot will ever fit. Boots have a natural break-in period even without the heat mold, but a good heat mold can save you a couple agonizing days in the mountains. Toe caps not only pack out space where you need it most, but force the heel back as the liner hardens, making a better pocket for control. Repeated heat molding will degrade the life of the liner so sometimes it best to handle hot spots one at a time instead of cooking the whole boot again. (Want to DIY? Check out Lou’s home boot molding tips from the archives.)
Shells
A few brands such as Salomon, Atomic and Tecnica and others are now toting thermo-moldable shells. The amount of space you can gain from baking the entire shell is impressive, but I would only recommend this to skiers with very hard to fit feet. It is a bit of a one way street: room can be created, but cannot be taken away. This can be a good options if you are downsizing your boots, but if your boots feel good already, try to ski them a few days before committing to any irreversible processes.
Footbeds
These cover a wide range of prices and constructions, from medical grade to complementary felt covered cardboard standard issued in every box of ski touring boots. Upgrading these can be an essential maneuver for shoring up the fit of your boots. A little arch support gives you better response as your boot will roll with your foot in every turn and also pulls your toes back from the front of your boot. Custom medical orthotics can cost more than $300 but there are some great over the counter products such as Sole or Superfeet that are only $30-50 and can get you most of the way there with some slight customization.
3. Go for a 1-2 hour tour
Coming from someone who has done irreparable damage to my own feet, this is a big one. My ambition and stoke for the kick turns has gotten the better of me before and all pain from wearing an uncomfortable pair of plastic shoes melts away as the summit grows closer. If you go out for an hour, even bad hotspots in the form of blisters or bone impingements can be addressed and recovered from quickly. If you are six hours into a tour, you could set yourself back for the entire season. Resist the urge on your first day or two out!
4. Prevent and treat blisters
You have taken steps to get in a proper fitting boot, but blisters still happen. After all you are taking thousands of steps in a row that some would call torture in the drier months of the year. A THIN pair of socks made of breathable, moisture-wicking material is a huge part of ski touring. Less fabric decreases your chances for it to ball up and rub and more easily controls temperature. Feet tend to sweat much worse while going uphill, but the sweat will freeze your toes solid on the way downhill.
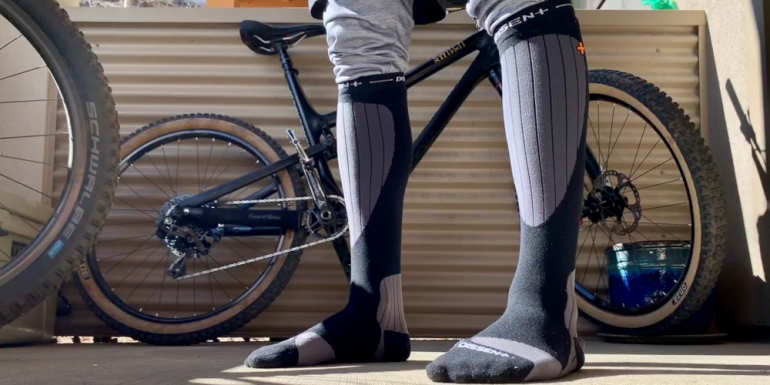
Thin socks are crucial for ski touring. Compression socks like these Dissent socks are a great upgrade. Yes you can go medical grade here too.
If you do encounter a blister, catch it early. That may mean pulling your foot out of the boot while standing in the snow. Or, stomp out a platform to place your pack on and sit on it. Point is, blisters have a far shorter impact on your ski day (or future ski days) if you nip them as soon as you feel those hot spots. Carry some moleskin in your first aid kit to place over the hot spot. If the blister has already burst, apply a hydroseal bandage with some climbing or duct tape over it. Treating blisters in the field isn’t ideal, but if you can at least get through the rest of the tour and clean better once you get indoors, you’re doing more than just letting it go. And if you failed to plan ahead, pull out the duct tape. If you’re fitting new boots and know you’ve got some hot spots already, tape those areas before putting on socks and heading out for a tour.
Pro Tip: Scarpa Aliens have violently sculpted heel pockets that although are great for performance can be crushing for blisters. Once you acknowledge this is a point of worry, tape them preemptively every time!
5. Punch or pad your touring boots
When the simple mechanisms for boot comfort have been addressed, it is time to operate. Talk to any friend that spends a hundred days a season in boots and you can bet they have resorted to some drastic measures.
It’s true that Polyurethane boots are easier to manage than their lighter Grilamid or carbon infused plastic cousins, but that doesn’t mean that all touring boots can’t be punched. The key is finding a local shop that is comfortable working with these different kinds of plastics. Melting points can be sensitive and the lighter the shell, the thinner the plastic. The right boot tech will know to go slower, hold the punch longer, and expand the boot incrementally. If you have weird ankle bones like me, or a heel spur that is under constant pressure, a good punch can alleviate the pain before it becomes a nagging problem.
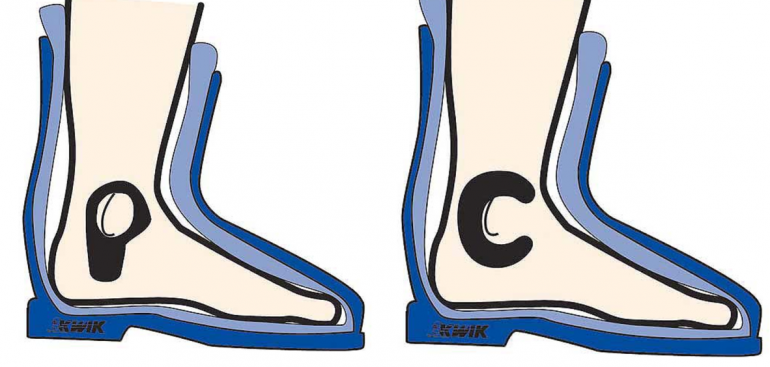
Since touring boots often have more space to work with, padding can be a great option before you bring out the expanders. Often times, black toe nails are born from sliding into the front of your boot rather than the fit being too tight. Adding foam to your instep can help lock your heel back and prevent this. A C-pad or donut of foam around an extruded bone can dissipate the pressure. Use caution with “mustache” pads over your achilles. This has become a common prescription, but can result in other issues as your foot gets pushed forward in the shell.
Pads as offered by SVST.com are a great option for alleviating bone pain before the problem comes chronic.
Pro Tip: Tongue Style touring boots often collapse the shell onto your medial malleolus (inside ankle bones) as you tighten the plastic. The cuff articulation can exacerbate this by rubbing the ankle against the constriction. This is an easy place to bend the shell out and can save a lot of pain. Check out our article on fitting the La Sportiva Spectre for details.
Above all, remember that fitting touring boots is a process. We ask a lot of our feet to go the distance in adverse conditions, but there is plenty you can do to make them comfortable. In the end the fit of your boots will be the last thing you think of on the final steps up the peak, before you rip skins and the sheer bliss of the descent takes over.
Doug Stenclik is an avid skimo racer and ski mountaineer who lives for sharing the amazing sports of ski touring and splitboarding. Since his first time on skins he was hooked and the obsession has taken him all over the United States and the world pursuing the human powered ski turn. He founded Cripple Creek Backcountry in 2012 and took over the Colorado Ski Mountaineering Race Cup in 2014 to spread knowledge and the love of the sport. In 2019 he took a step back from the ski shop and race promoter life to become a publishing partner with WildSnow.