Oh boy, mistakes were made? Hopefully you don’t hear that at the ski shop when you’re picking up your shiny new planks. More, let’s hope you are not shouting something stronger when you discover your binding mount is messed up and you’re standing on the summit of Denali — ready to launch — now you get to walk. Most shops (for example our publishing partner and sponsor of this post, Cripple Creek Backcountry) do a pretty good job of quality control. But human error happens. A few of the more common errors below. Some easy to check for, some presented as a warning as to why you should indeed trust your skis only to a top shop.
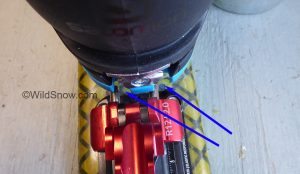
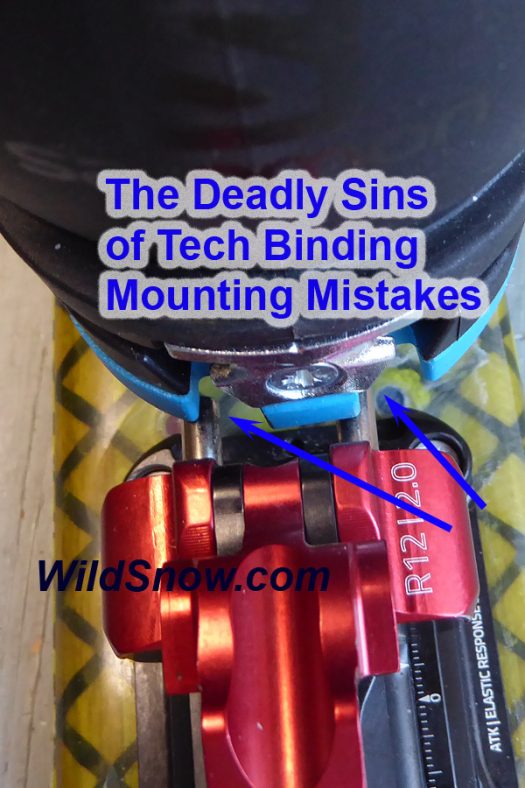
1. Boot heel off center
Why is this deadly: Too much misalignment preloads the binding heel lateral release, might cause an imbalance in how much retention the binding provides, thus possibly causing accidental release. Less dire, can also make it difficult to step-clip into the binding heel.
How to evaluate: Easy to check when you pick up your skis from the shop. Place boot in binding, in touring mode. Drop boot heel down so it rests on the heel pins (or other, in the case of hybrid binding). Check centering of the heel. It’ll usually be quite close, usually appearing near perfect. That’s best. But being off by a small amount is ok; a millimeter or so.
How to fix on the bench: Assuming the ski touring binding screw holes are not entirely messed up, remove front unit screws, reglue, reinsert screws but leave loose, lock boot in binding, push heel of boot to side until aligned, gradually tighten screws while continuing to apply “English” to the boot.
How to fix in the middle of the Messner Couloir: Not gonna happen.
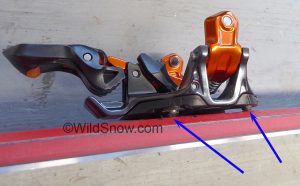
2. Screw jacked base plates.
Why is this deadly: Simply because the binding screws are not entirely inserted in the ski, and uneven screw pressure can crack the metal binding base.
How to evaluate: Another one that’s easy to spot. Look for binding base plates that are not snugged down onto the ski top. Screw jacking occurs when an inattentive mounting technician tightens screws, and while doing so doesn’t notice the screw threads catching on the binding plate and “jacking” it up off the ski top.
How to fix on the bench: Remove screws, possibly drill out the holes in the plastic base plate to slightly larger diameter, re-mount, taking care to keep plate pressed down on ski.
How to fix during ski tour on Mount Olympus, Greece: Get out your screwdriver, attempt tightening screws. Success may be unattainable due to glue blocking up the holes and preventing the screws from sinking.
3. Stripped screws.
Why is this deadly: This one can be a surprise dumpster fire as your binding toe or heel appear fine, but can come off the ski while you’re skiing. An unexpected and possibly violent fall could be the result. More, it’s likely your ski is lost, perhaps part of your binding. You might be hurt. It’s a long way home.
How to evaluate: Difficult to spot, easy to feel if you do it yourself. This is one where trusting a reputable ski shop to do the job right is your only hope.
Only way to fix: A real fix in the field is nearly impossible, though you can jury rig repairs such as inserting splinters of wood into the hole and re-inserting the screw. Problem is, you usually don’t know about the bad screw until you rip the entire binding off the ski. And where are those trees?
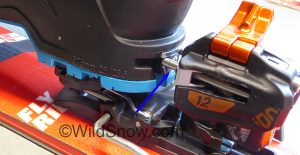
Improper boot length adjustment of a G3 Ion, too much space, correct adjustment involves closing up the gap between boot and binding. Each binding has a somewhat unique specification for this, know yours.
4. Improper boot length adjustment
Why can this be deadly? Wrong adjustment makes accidental release more likely, or even a given.
How to fix on the bench: Sometimes this is tricky, as we’ve even seen bindings with the same model name that require different amounts of space between the boot heel and the binding (known as the “tech gap”). Trust the ski shop — but verify by reading the binding documentation. This blog post goes into adjustment details, is curated, but difficult to keep entirely up to date.
How to fix anywhere: Assuming the binding has enough forward back adjustment to accommodate your boot length, get out your screwdriver and adjust it. Presumably you do know the specification?
5. Missing parts and pieces.
Why can this be deadly? Count the ways.
For a while, a certain binding brand had a removable brake, secured with a small metal clip. Poorly trained technicians often left this in the box or on the floor of the workshop. Even if the clip was installed correctly, you could hardly spot it. The brake would slide off the binding without the clip. Another example: Some bindings have a crampon mount that’s a separate piece — easily forgotten. Again, trust but verify with the binding documentation.
How to fix on the bench: Hold ski shop employee feet to the fire while using other hand to point at the binding document.
How to fix while ski touring a remote volcano in Chile: Duct tape and bailing wire, perhaps a Voile strap if you’ve got an extra.
6. Unglued screws, or wrong glue
Why deadly? Water intrudes into the screw boor, softening the ski core. Screw loosens or pulls out. With a shop mount, ask. They should be using either water resistant white glue, dedicated binding mount glue, or epoxy. We prefer epoxy for nearly all mounts (exception being our tests and demos).
How to fix: Back out one screw at a time, apply glue, re-torque.
How to fix in the field: Tighten screws, ski carefully, glue when you return to civilization.
7. What’s the seventh? Reader’s comment!
Last thought. If you ski much you’ll probably fix a few of these problems yourself, someday. To do so you want a nicely equipped shop of your own. Time to generate that gift list for your significant other.
Tool posts:
Specific to this post, The Tech Binding Tool Set.
And check out 10 tools for the complete home ski shop.
Let’s make it a triad,Yet more tool ideas.
(This post sponsored by our publishing partner Cripple Creek Backcountry.)
WildSnow.com publisher emeritus and founder Lou (Louis Dawson) has a 50+ years career in climbing, backcountry skiing and ski mountaineering. He was the first person in history to ski down all 54 Colorado 14,000-foot peaks, has authored numerous books about about backcountry skiing, and has skied from the summit of Denali in Alaska, North America’s highest mountain.
44 comments
Great checklist, Lou! Especially valuable for someone new to tech bindings.
One nit-pick: Improper boot-length adjustment can also lead to a less-functional or non-functional release mechanism, arguably worse than one that releases too easily.
It seems to me that if you attempt to fix problem 2 on Mt. Olympus using the method described, you risk causing problem 3. Stripped screws might be worse than skiing on a slightly jacked binding until you can get back to the shop to fix it properly.
I’ve seen/experienced every one of these. You covered it all I think. On a good note, I just received my new UL 78’s from Skimo.co, mounted with Plum 150 racing bindings. They are mounted perfectly. Racing bindings are even more finicky than touring bindings. The sole length has to be spot on. I wouldn’t dare mount them without a jig supplied by the factory.
Would one stripped screw (out of four or five) really cause a binding to rip out?
Sure, especially if the bindings was “worked” for a few days.
Thanks Lou! For #1, a key tip is to mount bindings using both boots, especially if they’re older boots. I had some Scarpa Lasers about 15 years ago that required dedicated left and right skis.
I asked the local shop guy/ski bud how he mounted AT and he gave me a real simple tip that made sense
Mount the heelpiece dead center, mount the toe at centerline by one screw only, lock the boot into ski mode so the toe can pivot around to find its happy place, mark/drill the other screw holes in the toe piece
No jig or template to shift around so tech or frame it always seems to work
Mounting the heel first is key, but can be done _after_ drilling all holes with a jig. You get a bit of fudge factor with the toe even after the holes are drilled. Trigged out through the length of the boot = lots of side-side adjustment of where the boot heel ends up.
An oddly frequent error from shops that don’t mount many tech bindings: bindings aren’t mounted to the ski center line.
Patrick, can you be more clear? Are you talking about the boot ending up to far forward or back based on the recommended position mark? Or are you talking about the binding being off center left-right? Thanks, Lou
A little late, but I have experienced off center left right on three different pairs, all from different shops. The last two of them this season.
One nit I have to pick with manufacturers of most tech bindings is the fact that they countersink (instead of counterbore) the toe holes.
Fritschi is the only exception I’m aware of (haven’t played with Plum, ATK, Trab).
With a counterbore, you can more effectively finagle the toe piece’s orientation than with countersinks.
… Thom
Another common problem I’ve encountered over the years is premature contact of the boot sole with the arms supporting the toe pins on the binding toe as the heel is brought down. This could, I imagine, add upward pressure on the toe and/or the heel at baseline, increasing the risk of pre-release. Easy enough to carpet test to see if this is a problem, and a little work with a box cutter blade on the sole of the boot should fix the problem. I haven’t yet discovered a fix for the anxiety felt when taking a sharp knife to the sole of a $1000+ pair of new shoes ….
Sam, thanks, perhaps that’s #7, as it can slip by the person installing the bindings, and subsequently cause accidental release. Lou
For #6: What’s the verdict on wood glue? Asking for a friend who’s done a lot of mounts with wood glue…
Hey do you guys know what the deal is with the Look HM12 binding? Is Dynafit just rebranding their Radical FT 2.0 for Look/Dynastar?
Is this the first time they’ve had this arrangement?
Hi Michael, in my experience, wood glue is not good for long-term use in wet environments. Ok if the gear is not heavily used and/or used with less free water, for example used more during cold mid-winter, in dryer snow climates. It’s not something to obsess over. Easily evaluated by removing one screw and examine for corrosion and discoloration from water intrusion. Re install screw with similar glue if ok. If not, time to take all screws out and renew with glue of choice.
Where this really holds true is with used gear. Clearly, if you buy used skis with unknown provenance, screw glue inspection is mandatory, perhaps even a binding removal and re-mount to be sure no screws are stripped.
This sort of stuff is not DIY level 1, it’s easy to break or otherwise damage screws during removal attempts. I excessive force seems to be required to remove screws, time to re-evaluate need for inspection, or time to try heat to break the glue bond.
Lou
Quiver Killers machine screw inserts can help solve some of the binding screw problems and allow for easier fixing in the field.
Super tech needing question of the hour: Is there a way to thoroughly stir epoxy resin and hardener without introducing air bubbles to the mix?
Hi Mark, I’ve never had a problem with that, perhaps try a different epoxy, and try a mixing board if you’re using a cup. Lou
Lou, looking for your opinion on mounting touring boards with or without epoxy? I have pulled out the front 5 screws on my dynafit radical ft binding twice now on 2 different pairs of skis. After bring this to my local ski shops attention and asking if they used epoxy they said your not supposed to use epoxy and that had nothing to do with it?
How critical is it to have the bindings mounted same distance fore/aft? Just got my brand new skis back & one heel/toe piece is nearly 1cm (1/2”) farther forward.
Also, Deadly Sin #1 is in full force— one boot heel is as off center as your exaggerated photo shows.
Any recommendations? Thought taking them to the pros was the right thing to do…
I’ve been testing how epoxy cures. Medium cure epoxy (System Three #2 medium hardener) is supposed to cure tack free within 4-6 hours considering minimum air temperature of 55 degrees F. In a small plastic food sample cup, with approximately 30 ml of epoxy and hardener, well mixed at a ration of 2:1, the epoxy mixture in the cup has cured almost totally tack free in less than 3 hours. The same epoxy used for actual bonding of materials is significantly more liquid as tested concurrently with the epoxy in the cup. I’ve observed this several times in the realm of binding screw holes as well. Perhaps the greater volume of epoxy in a vessel, as compared to that of a binding screw hole, cures more quickly due to increased thermogenic effect. I guess the moral of the story, so to speak, is don’t assume your screw hole epoxy is cured just because the epoxy left over in the mixing vessel is done curing.
Sue, having the bindings mounted at the same spot longitudinally is standard, and one being about a centimeter forward of the other is poor. Will they ski noticeably differently? Perhaps. And having one boot heel hit way off center is also poor workmanship. A remount might be in order. What bindings do you have?
Mark, I think you’re correct, the epoxy in the pot gets hot, but when used in small amount it stays closer to ambient temperature and cures slower. Good observations. Thanks, Lou
The only time I got burned (pun intended) using epoxy is when mounting some Atomic foam core XC sks about two decades ago. The heat ate up the core.
West Systems 650 Marine Epoxy is my “go to” for mounting these days.
… Thom
A few epoxy hints from someone who has used hundreds of gallons of the stuff:
Unlike polyester “fiberglass” resins that use a few drops of promoter to start the reaction, epoxies are a two component product. Mix rations must be observed. Every molecule of part one needs to kiss every molecule of part II. Stir thoroughly!
If you mix more than about a half quart and leave it in the pot you will soon have a smoking mess that is trying to light itself on fire. Mix only what you need and spread it out on a piece of plastic first if you want the working life to approach that on the label.
Use Cab-o-sil powder as a filler to increase the viscosity if you are using it to fill a porous area like a honeycome core or void from a core shot. Use something like a Q-tip as a plunger to force epoxy back into the core when filling old screw holes during a remount. After the initial fill has kicked then liquid epoxy can be used to fill the holes flush and create a totally watertight bond. Throw all those ski shop plastic plugs out the window if you really want to keep water out of the core.
Thanks RDE, keep the tips coming! Lou
Laurence, you need to find another ski repair shop! If you are trying to hold fasteners in fiberglass, wood or low density core you will increase the holding power of the fastener several fold by properly using epoxy.
ps: always completely clean any residual oil or contaminants off the fastener before coating it with epoxy. Acetone is a good solvent. for this use. just rattle them around in a small container filled with Acetone and let dry. No paint thinner or other oil based solvents! Ever!
If the epoxy does too good a job when it comes time to remove the screw, warm it up with a soldering iron and she’ll release like butter.
One mistake Ive seen is a shop doing everything right with the heel mounted first then the one screw in the toe to align before drilling the rest of the toe, then drilling the rest of the toe. HOWEVER, after then adding epoxy to the toe holes they re-inserted and tightened the screws in a different order than originally done which threw off the binding enough to create sin #1.
Jesse, I myself have of course never done that (smile). Thanks for chiming in. Lou
I’m working on a look at some nice pants. Nope, I’m not at the nightclub, just covering the OR Syward 2. Didn’t quite get it done. So much good content buried here. So I brought this post up to the top. Thanks Jesse. Lou
My ski shop is highly respected in SLC, very b.c. centric, and they told me the glue they always use is non-water resistant carpenters glue. Over 8 years and 4 mountings I’ve never had a loose screw (debatable my wife tells me), yet I’m nervous given industry talk.
As for field unreparables: the plastic heel base plate splitting in half so the heel binding slides backwards and is no longer fixed. I use to be a good Tele skier but it doesn’t work on tech equipment.
Reading some of these confirms my commitment to all my skis being fitted with inserts. I do the remount myself. I’ve had a couple of close calls with alignment but no failures in at least 15 pairs of skis. Getting all the machine screws started with all screws loose and then tightening sequentially while maintaining heel pin alignment and then allowing to cure with the boot in place results in a fine result. I’ve also found that the “English” tweak on the toe piece works great with inserts, as well.
Have experienced most of these cases; also, a pair mounted facing the wrong direction (both skis), dimpled bottoms, and leaving a binding release set to “0”.
I mounted bindings for a living waaaay back in the day. As a hobbyist, I use a drill press, slightly more effort, but it keeps everything dead center, perpendicular, and perfect depth with no wandering slightly off center holes or unwanted angles. And it is more than worth buying the correct ski specific shouldered drill bits.
And having discovered Gary at Cripple Creek, I let them do it.
Kristian, the burning question is how long it took you to realize the bindings were facing the wrong way ?! (smile)
Immediately of course. What was more amazing was that I had to point that out to them…
This one hits close to home. I had an online retailer commit almost everyone of these ‘sins’ in one purchase. I ordered skis, distinctly DID NOT request a binding mount and lo and behold they showed up mounted (They knew my boot size based on a phone conversation). The boot heel was off center, the binding plates were screw jacked, and to top it off they used wood glue. Sometimes you get hosed even when you try and avoid the issues–I always take my skis to a Dynafit certified shop here in the PNW and have never once had a problem. Long live brick and mortar! To their credit the online retailer paid for return shipping of the skis and gave me a full refund, I ended up buying the same skis from another shop.
2. Screw jacked base plates-Remove binding, scrape off hardened glue proud of ski deck, hold binding tight to ski while reinstalling screws.
3. Stripped screws-Splinters plus fast cure epoxy (keep warm).
5. Trust but verify. Belt and suspenders or weasel words?
Sin #7
Buying a brand new, “innovative” model of tech binding in it’s first production year.
Why this is deadly?
New models frequently have design flaws and durability issues that aren’t discovered until consumer act as beta testers.
Hi Lou – love your site. Thanks for what you do. I wonder if you have thoughts about mounting point for touring skis, in light of different center of mass / balance related to carrying a pack. On the one hand, I’ve felt like a backpack contributes to being backseated – making me want to cheat my mount forward. On the other hand, I’ve also felt the sensation of a pack pushing my balance forward on steep descents or running into mankier snow. Thoughts?
Tree, I’ve indeed thought about that over the years, and experimented. At least for myself, I came to the conclusion that backpack or not, I wanted to be in the same place on the ski, preferably the sweet spot as determined by the factory as well as skiing the ski. A couple of backpack related things that _have_ been valid for me. Going lighter is of course the big one. But also, when I used a pack that gets the weight lower, such as those triangular shaped ski touring packs Dynafit is known for, I noticed a real difference if I had much weight. Lou
Thanks Lou! Lower center of mass makes sense. I wonder if cheating toward a longer ski might be worth it?
Lou:
Came here hoping to find test on new Marker binding before I order for next year. Not here yet but I’ll keep checking.
While here I poked around your binding mounting list. Like your list but have a few quibbles or comments. Regarding jacked screws I’m not certain the biggest problem is breaking the binding. The biggest problem IN MY OPINION is more likely to be pulled binding.
Epoxy screws? Why? Can only minimally if at all strengthen screw hold since the bond of the epoxy to the core controls the pullout strength. Bitch to remove screws for binding remount.
Comments are closed.