– The Backcountry Ski Touring Blog
  • Avalanches
  • Gear Reviews
    • Ski Reviews
    • Boot Reviews
    • Binding Reviews
    • Snowboard Splitboard
    • Book Reviews
    • Avalanche Beacon Reviews
    • Airbag Backpacks
    • Backcountry Electronics
    • Misc Gear Reviews
  • Podcast
  • Tips & Tricks
    • Ski Touring Basics
    • Boot Fitting
    • Fitness & Health
    • Gear Mods
  • Trip Reports
    • Fourteeners
    • Huts – Cabins – Lodges
    • Denali McKinley
    • 8,000 Meter Skiing
  • Stories
    • History
    • Humor
    • Land Use Issues
    • Evergreen Ski Touring
    • Poetry
  • Resources
    • All Posts Listed
    • 100 Recent Comments
    • Backcountry Skiing & Ski Touring Webcams
    • Ski Weights Comparison
    • Archives of WildSnow.com
    • Authors Page
    • Ski Touring Bindings
      • Trab TR2 Index and FAQ
      • Salomon Guardian & Tracker
      • Naxo Backcountry Skiing Bindings – Info Index
      • Silvretta Pure Backcountry Skiing Bindings – Info Index
      • Marker F10-12 Duke Baron
      • G3 Onyx Ski Binding FAQ
      • G3 ION Ski Touring Binding
      • Fritschi Backcountry Skiing Bindings – Info Index
      • Fritschi Diamir Frame Bindings Mount DIY
      • Fritschi Diamir Bindings FAQ
      • Fritschi Tecton FAQ
      • Atomic Salomon Backland MTN
      • Dynafit Tri-Step Binding 2001-2003
      • Naxo randonnee alpine touring AT ski binding FAQ
      • Dynafit Skiing Bindings – Info Index
      • Dynafit Binding Frequently Asked Questions FAQ
      • Dynafit Beast 16 FAQ Review 1
      • Dynafit Beast 16 FAQ Page Two
    • History
      • Ski Touring Binding Museum
      • Trooper Traverse Intro & Index
      • Randonnee Ski Touring “AT” ski gear — What is Hip?
      • Chronology
    • Backcountry Skiing Core Glossary
    • Gear Review Policy & Disclosures

– The Backcountry Ski Touring Blog

Banner
  • Avalanches
  • Gear Reviews
    • Ski Reviews
    • Boot Reviews
    • Binding Reviews
    • Snowboard Splitboard
    • Book Reviews
    • Avalanche Beacon Reviews
    • Airbag Backpacks
    • Backcountry Electronics
    • Misc Gear Reviews
  • Podcast
  • Tips & Tricks
    • Ski Touring Basics
    • Boot Fitting
    • Fitness & Health
    • Gear Mods
  • Trip Reports
    • Fourteeners
    • Huts – Cabins – Lodges
    • Denali McKinley
    • 8,000 Meter Skiing
  • Stories
    • History
    • Humor
    • Land Use Issues
    • Evergreen Ski Touring
    • Poetry
  • Resources
    • All Posts Listed
    • 100 Recent Comments
    • Backcountry Skiing & Ski Touring Webcams
    • Ski Weights Comparison
    • Archives of WildSnow.com
    • Authors Page
    • Ski Touring Bindings
      • Trab TR2 Index and FAQ
      • Salomon Guardian & Tracker
      • Naxo Backcountry Skiing Bindings – Info Index
      • Silvretta Pure Backcountry Skiing Bindings – Info Index
      • Marker F10-12 Duke Baron
      • G3 Onyx Ski Binding FAQ
      • G3 ION Ski Touring Binding
      • Fritschi Backcountry Skiing Bindings – Info Index
      • Fritschi Diamir Frame Bindings Mount DIY
      • Fritschi Diamir Bindings FAQ
      • Fritschi Tecton FAQ
      • Atomic Salomon Backland MTN
      • Dynafit Tri-Step Binding 2001-2003
      • Naxo randonnee alpine touring AT ski binding FAQ
      • Dynafit Skiing Bindings – Info Index
      • Dynafit Binding Frequently Asked Questions FAQ
      • Dynafit Beast 16 FAQ Review 1
      • Dynafit Beast 16 FAQ Page Two
    • History
      • Ski Touring Binding Museum
      • Trooper Traverse Intro & Index
      • Randonnee Ski Touring “AT” ski gear — What is Hip?
      • Chronology
    • Backcountry Skiing Core Glossary
    • Gear Review Policy & Disclosures
   

Tech Binding Toolset — Part 3 — Determine Left-Right Center of Ski

by Lou Dawson July 20, 2017
written by Lou Dawson July 20, 2017

Part 1 — Screw Driving
Part 2 — Ski Binding Specific
Part 4 — More Tools

Many ski binding mount templates require locating on the left-right center of the ski. (Some templates have marks you can attempt to line up with the ski’s outside top edges, but with most skis having curved top edges, using a center line is better.)

In our DIY binding mount posts we mention various methods of determining the ski’s lengthwise center. It occurred to me we should make a blog post that’s specific to only this one process (and required tools) as it is so important, and a bit tricky due to the sides and top of the ski being curved and the ski’s width changing as you move your measurement point between tip and tail.

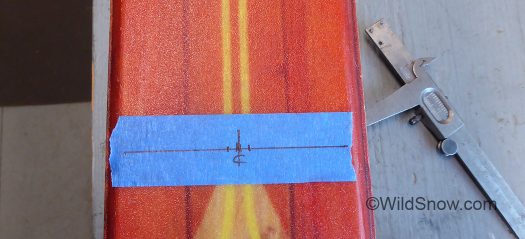
No matter what method you use for bifurcation, first step is to mark the locations where you’re finding ski centers so that ski width change won’t mess up the process. When I’m in a hurry, I just use eyeball the placement of a straightedge and draw a reference line across the ski. When I’m more concerned about neatness and don’t mind an extra step, I use one of the more detailed methods outlined below, and apply painter’s tape to prevent making marks on ski.

(I won’t get into the entire mounting process details here, instead see any of our mounting how-to pages. For those of you new to this, suffice it to say that the center marks are located some distance to rear and front of binding mount location and connected with a longitudinal center line. The center marks on the paper binding mount template are then registered on the line.)

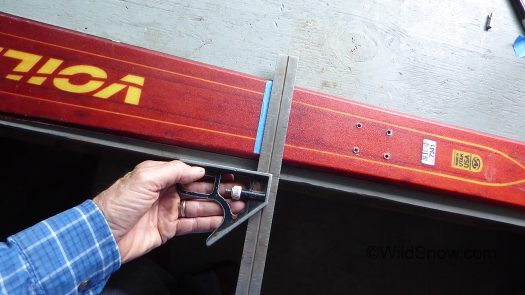
The perfectionist method for drawing square mark across skis: Lay the skis parallel to the edge of your workbench. Keep the ski tip next to bench edge, but move the tail a bit away from edge due to ski being narrower at the rear. You can measure to find the tail offset, but a centimeter works well enough for most reasons you’re doing this. With ski thus in “true parallel” to the workbench edge draw your reference lines using a carpenter’s square held against the bench edge.

Once the ski is marked, you can use one of four methods to find ski left-right center:

1. Simply eyeball a ruler placed across the top of the ski. Not highly accurate, but fast and often adequate.
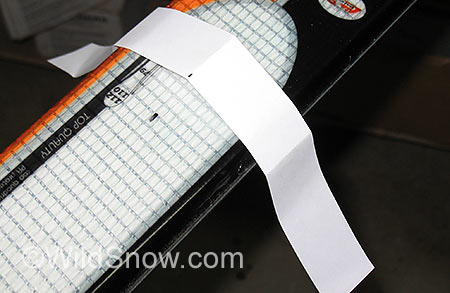
Using paper folding to find center of ski, left-right.

Using paper folding to find center of ski, left-right.

2. The “paper strip” method is quite accurate and simple. Wrap a strip of paper around the ski, crease it over the sharp steel base edges, remove and fold in half using the edge marks as reference, again place on ski and use the crease to locate center. While simple, work carefully (mainly, mark the spot on your ski where you place the paper, as moving it towards the tip or tail will throw things off because of the ski’s varied width.)

3. Use your calipers to measure ski total width, divide in half, and figure out a way of transferring measurement to ski. Laying a ruler on the ski as in #1 is quick, but again subjects you to dealing with the curved ski top edges. Better, buy a cheapo caliper and do a tool mod to specifically create a tool for finding ski centers.

4. This is my favorite, it seems quickest while still accurate. Using modified caliper, swap ski side you measure from a few times, make marks, adjust caliper as you go until you’re making opposing marks just a millimeter or so apart, then eyeball your final dot. Once you practice this method a few times, you’ll be surprised how fast you can bisect the width of the ski. But the modified tool is essential.
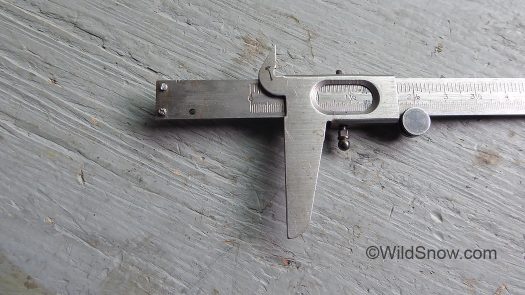
Modified caliper for measuring top of skis with curved top edges.

Modified caliper for measuring top of skis with curved top edges. Use to find center, or double check your center line by flipping the caliper from side to side. For about 10 bucks I’ve found this to be a super useful tool.

Using modified caliper to find ski center, just approximate, switch sides and make marks, you can usually narrow it down in two steps.

Using modified caliper to find ski center, just approximate, switch sides and make marks, you can usually narrow it down in two steps. You can also measure the ski width then set caliper to 1/2, but doing so still needs verification, and thus seems redundant.

A few steps with the modified caliper and you have your center. Quick.

A few steps with the modified caliper and you have your center. Quick.

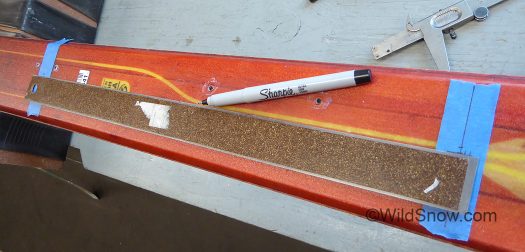
Connect center marks with straightedge for the ever elusive bisection.

Connect center marks with straightedge for the ever elusive bisection.

For the caliper mod, get a cheapo non-digital steel caliper and remove the upper arm. Photos above makes this clear. Funny thing is it’s rather hard to find the truly inexpensive caliper you need for this.

My initial search on Amazon got 63,432 caliper results. Took me a few days to narrow it down. So you don’t have to.

Amazon link to right is the best price I could find on a non-digital basic caliper. Hardware store and big box home supply usually sell these as well.
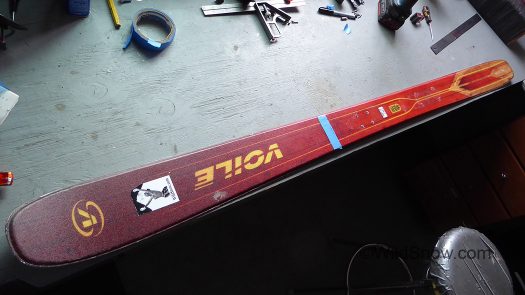
To draw a nice 'square' line across the ski, use edge of workbench, with tail of ski offset about a centimeter from the edge.

To draw a nice ‘square’ line across the ski, use edge of workbench to anchor your carpenter square, with tail of ski offset about a centimeter from the edge.

Carpenter square and workbench edge, making nice line.

Carpenter square and workbench edge, making nice line.

If any of you guys have tricky ways of finding ski left-right centers, let me know. In the old days with minimal sidecut skis I used a center finder made from a bar of steel with two pins through it and a hole in the middle of the bar. You just set it on the ski, rotated to snug, and marked through the hole. I keep thinking something similar must be available.

About the carpenter’s square: a large “framing” square works best, but that’s a specialized and unwieldy tool, so try doing it with something smaller. A tri-square is adjustable, useful for general DIY projects, and can also be used as a crude way of finding ski left-right center (same concept as the modified caliper, adjust length of tri-square blade and flip back and forth on ski top).

Lastly, is “longitudinal” the correct word?

23 comments
0
FacebookTwitterPinterestEmail
previous post
WildSnow News Roundup — July 2017 — Tiny Houses, Drones vs Eagles
next post
Randonnee AT Ski Touring Boot ISO Standards

23 comments

atfred July 21, 2017 - 7:14 am

I’ve used your paper folding method – works great, quite ingenious.

Spencer July 21, 2017 - 10:29 am

I like to use a centering ruler combined with a normal set of calipers. You can print out a centering rule and tape it to a ruler, quick and cheap.

This picture shows a good illustration of the process: http://www.slidewright.com/centerline/

I will mark the centerline in a few places then connect the dots and measure from the line to the ski edge to double check.

altis July 21, 2017 - 1:58 pm

A woodworking gauge works well too:

http://warringtonbears.org.uk/inserts/med_1617.JPG

Jim Milstein July 21, 2017 - 6:17 pm

I think tri-square is better spelled try square. It’s used to try squareness. No apparent connection to three.

zippy the pinhead July 23, 2017 - 6:02 pm

Hi Lou,
I don’t like to nitpick, but I’m pretty sure you misused the word “longitudinal” in this case. (Okay, sometimes I like to nitpick…)

From merriam-webster.com:

Definition of longitudinal

1: placed or running lengthwise. The insect’s back is black with yellow longitudinal stripes.

2: of or relating to length or the lengthwise dimension. The longitudinal extent of the building

3: involving the repeated observation or examination of a set of subjects over time with respect to one or more study variables. A longitudinal study of juvenile offenders over a period of five years

So, with definition number two being the one in play, the “longitudinal center” of a ski would be center of the lengthwise dimension, i.e. the mid-ski location which usually lines up with the boot-sole center.

When I first saw the title of this post a couple of days ago, I was expecting a discussion of cord-length etc, and was confused by the way you used the phrase — it just didn’t seem right to me. When I saw the title again today, I decided to look it up.

That being said, I will be using your “paper strip” method to remount a pair heel blocks that were off-center after the first mount. A friend who works in an alpine (not touring) shop did it by eye. No, he didn’t charge me, and you get what you pay for (or less).

Happy trails…

Lou Dawson 2 July 24, 2017 - 7:25 am

Zippy and all, I agree, longitudinal is probably not the best word. I did agonize over it a bit and never came up with something I felt totally comfortable with. “Lengthwise center” doesn’t seem to work either, as it implies something like the boot sole mark. I’ll do some edits, seems like phrases such as “left/right” center are better, combined with a description of the end goal, e.g., “next step, mark a fairly long line in the binding locations, showing the the left-right center of the ski (see photos).” Some medical type terminology might be useful, perhaps for example “medial?”

I do need to get this figured out, it’s been bugging me for years.

Lou

Jim Milstein July 23, 2017 - 6:11 pm

Zip, in defense of His Bloggedness’s usage, let’s interpret longitudinal center as short for longitudinal centerline rather than longitudinal center point. That is, as we say, good enough for the mountains.

afox July 23, 2017 - 10:03 pm

I use the paper method. Its a PITA but works well.

If a ski manufacturer were to put “longitudinal center” marks on their skis I would be more likely to but them. I know the graphics are not precise, I probably learned it here but dont be fooled into using the graphics for measurements when mounting. They do mark boot center on skis though so no reason why they could not do the same for longitudinal center. Could just be a few unidentified and non-descript dimples in the top sheet.

Lou Dawson 2 July 24, 2017 - 7:15 am

Afox, yeah, the way most ski graphics are applied to skis is not inherently accurate to the level that would work for providing things like center marks. Lou

Torquil July 24, 2017 - 2:05 am

1) print off Wild Snow paper template.

2) trim the template to fit on the ski.

3) use the trimmed-off strips to find the ski centres.

I’m guessing that’s how it goes for a lot of us! And then for me it’s a flat square laid along the centre line, more accurate than the bench edge method possibly?

Matus July 24, 2017 - 2:10 am

I usually measure the real width on the base side of the ski. Much quicker and easier. To mark the top sheet, all you then need is the 90 degree L shaped piece of wood/aluminium, ruler and thin marker.

Jim Milstein July 24, 2017 - 8:30 am

Center line

zippy the pinhead July 24, 2017 - 11:02 pm

Exercising my search-engine-fu, I came up with a couple of antonyms for longitudinal:

transverse:
Situated or lying across; side to side, relative to some defined “forward” direction.

crosswise:
Lying or extending across the length of a thing or in a cross direction.

I think either of these would do.

“Transverse” sounds more technical, and is probably a slightly better description because of the reference to a forward direction.

However, “crosswise” is simpler and seems easier to understand.

Happy trails….

Jim Milstein July 25, 2017 - 6:56 am

Longitudinal center line is exactly the term you want. No ambiguity. If you want to avoid the latinate term, Lou, you could call it the lengthwise center line or the left-right center line. However, I think lengthwise is much better than left-right. There’s nothing wrong with longitudinal, however, other than an allergy to longitude, which many people have these days. It’s caused by peanut dust.

zippy the pinhead July 25, 2017 - 12:01 pm

Hi Jim,
I fail to understand why you insist on using a word which relates to length (and which even has “length” as it’s root word) to describe a width-wise measurement.

I tried to find a definition for the phrase “longitudinal centerline” but came up empty.

Application of definition #2 from my example above would suggest “centerline of the lengthwise dimension”.

We are, conversely, trying to describe the center of the *width-wise* dimension.

I’m also not sure why you seem to reject two words which I suggested (even supplying definitions) and which perfectly describe the measurement we are discussing.

Furthermore, I resent your ad hominem comment regarding allergies and peanut dust. I know you were attempting humor, but it detracts from the conversation.

Even so, as I said once before, I’d still like to ski with you sometime. I’ll bring the peanuts for snacking.

Happy trails….

atfred July 25, 2017 - 9:23 pm

How about “ski width midpoint”? Points should be the same wherever measured along the ski length. Connect the points and get “ski width midline”

Frame July 26, 2017 - 6:21 am

Zippi, I think it comes down to interpretation. I interpret longitudinal center line, as the line running the length of the ski, which in turn gives you, halfway between the edges of the ski.

Technically correct, I see your point. How my little brain works, I understood Lou’s meaning.

Jim Milstein July 26, 2017 - 7:08 am

A longitudinal line runs lengthwise along the ski. There can be no dispute about this. A longitudinal center line is the unique one centered on the ski, i.e., midway between the edges. What is the problem?

All the other names for this line, except for lengthwise center line, leave a little room for doubt as to what exactly the heck you are talking about.

I know, it’s summer. What else is there to do? Excuse me, please, my bike is calling.

Lou Dawson 2 July 26, 2017 - 9:38 am

Zippy, thanks for your patience. Jim, please go easy on the attempts at humor that could be construed as an insult. Remember that in this type of forum environment, the _perceived_ intent of a statement is what’s important.

I’d imagine someone out there is laughing at us right about now (smile), but yeah, if we’re going to keep the written word alive in our own meager ways, working on this stuff is important. So thanks all.

At this time I’m feeling like “longitudinal” is the accurate term, but it might need clarification for folks who are not used to working with technical writing. So I’ll use the “left-right” term occasionally, and some other stuff. Various photos of just the line on the ski, with concise caption, would probably help as well.

So my writing would go something like this: “Step X: Draw an accurate left-right centerline on the ski, in the area of the binding mount. Creating this “longitudinal i.e.lengthwise” center line requires a few steps. First, find a couple of left-right ski centers, then connect with a straightedge, inked in with a fine point Sharpie. In detail…..”

Lou

Jack August 2, 2017 - 10:32 am

ah, long-axis might be easier to understand. As in “imagine a line on the top surface of the ski, centered left to right, and along the ski’s long-axis.”. Please send snow, I’m obviously Joneing.

Colin Stone November 9, 2017 - 10:34 am

As a refinement to the paper method, a paper tape measure would provide an instant indication of the ski centre.

Mark W May 23, 2018 - 9:53 am

The modified caliper I used to good effect in mounting the heels of Dynafit Expedition bindings. Works great. Thanks.

Lou Dawson 2 May 23, 2018 - 10:58 am

That’s super Mark! Lou

Comments are closed.

Recent Comments

  • andrew on Plum R170: A First Look
  • Greg on Plum R170: A First Look
  • Jake on Springtime Primer: Securing Skis/Splitboard to a Bike Frame
  • Skis_the_trees on Springtime Primer: Securing Skis/Splitboard to a Bike Frame
  • Alex on Springtime Primer: Securing Skis/Splitboard to a Bike Frame

Gear Reviews

  • The Ski Trab Deep Look: Ski Trab Magico.2 Skis, Titan Vario.2 Binding, and Branded Mohair Skins

    May 13, 2022
  • BCA’s FLOAT E2 25: The Alpride E2 Side of the Equation

    April 29, 2022
  • BCA’s FLOAT E2 25: The Pack Side of the Equation

    April 27, 2022

Trip Reports

  • Techniques and considerations for ski mountaineering on glaciers

    February 16, 2022
  • Making the Most out of the Alaska Range

    February 14, 2022
  • Emergency Layers for Backcountry Travel

    February 7, 2022

Totally Deep Podcast

  • Totally Deep Podcast 99: Big Geography with Roman Dial and Alex Lee

    April 20, 2022
  • TOTALLY DEEP PODCAST 98: Live at the EMGT with Cam Smith

    April 12, 2022
  • TOTALLY DEEP PODCAST 97: Talk of Gear for Next Year

    March 23, 2022

Tips & Tricks

  • Fueling For Ski Touring

    May 3, 2022
  • The “New Math” for Sheltering from the Storm

    May 2, 2022
  • A Simple Ski Crampon Mod

    April 21, 2022

Ski Touring Stories

  • Backscratchers in My Brain

    April 6, 2022
  • Blessing of the Freeheelers & Bon Voyage Grand Traversers

    April 2, 2022
  • Mentorship On My Mind

    March 31, 2022

Newsletter Sign-Up

  • Facebook
  • Twitter
  • Instagram
  • About Lou Dawson
  • Authors Page
  • About
  • Contact
  • Copyright & Legal
  • Website Security

@2020 - All Rights Reserved. Designed and Developed by WildSnow


Back To Top

Read alsox

Plum R170: A First Look

May 18, 2022

Patagonia’s Womens Stormstride Pant

May 17, 2022

The Ski Trab Deep Look: Ski...

May 13, 2022