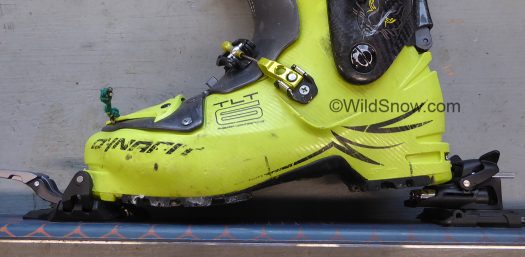
I’m been skiing on the TLT Speed binding that’ll be available this fall. Here’s a quick “2-fer” report from the unboxing and mounting stage of the event. (Original blog post covering TLT Speed and Speedfit)
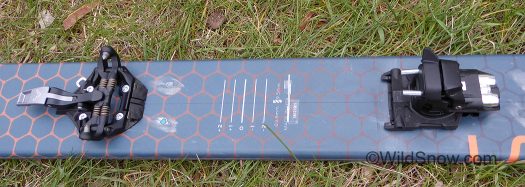
The whole sandwich. Tasty layers, latest Sportiva Vapor is almost too amorphous to to be considered as nutrition. TLT Speed is minimal as well. Funny how this low calorie meal still satisfies. (Binding heel is missing a small cosmetic cap that snaps on to cover the front.)
The names confuse. For example we have the TLT Speed Radical. TLT Speed Turn, and so on. Know that TLT SPEED (with no other prefixes or suffixes) is a new binding from Dynafit for the 2017-2018 season. It’s black, mostly aluminum and plastic, and uses the classic U-spring design that results in a fixed upward-vertical release at the heel while having adjustable side-lateral release.
This same binding design, only slightly heavier, will also be available in the TLT Speedfit. This intended as a lower priced alternative aimed at the fitness uphilling crowd. Both options are at good price points.
TLT Speed: $499
Speedfit: $449
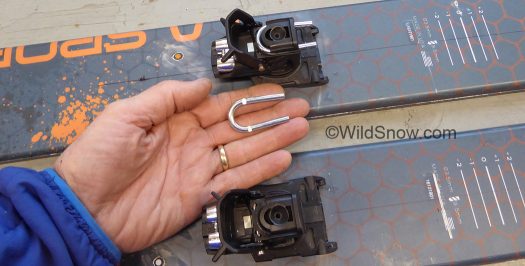
TLT Speed uses the classic U-spring binding design. Clearly this reduces price and weight, but at the cost of no vertical release adjustment.
In my opinion the operative issue with both these competitively priced and nice looking bindings is their release values. TLT Speed has lateral-side release value (RV) catalog stated range of “6-12” (Speedfit version at “5-10”). But, and it’s a big BUT, that’s only the lateral release. Upward (vertical) RV is not adjustable and instead set by the stiffness of the U-spring. Word is TLT Speed will come in at “9.” with the Speedfit providing a “6.”
In the case of my testers, in my estimation they delivered vertical RV at around “DIN” 12 or more, as I couldn’t for the life of me snap my boots in on the workbench, and even had trouble stomping in on the carpet. Admittedly this was a pre-retail pair of test binding. How will the retail U-spring perform? I’m confident Dynafit will deliver something close to the fixed vertical release values they quote. Still — how close that is, related to what you actually require, is going to be something to consider.
For example, say you usually ski your bindings at release value (RV) around 7, and you clip into a TLT Speed that’s around a 9.5. That’s perhaps a compromise you should not make. Conversely, say you’re a big guy and generally ski with your bindings at the proverbial 11!; you might throw a shoe if you’re skiing at RV 9.
(Yes, Virginia I did grind down my stiff U-springs to get the vertical release within tolerable levels. I knew you’d be curious about that. As indeed, everything at WildSnow dot com must be modified. But please do not try that at home. Doing so could dangerously weaken the spring and of course voids warranty.)
Enough of my yammering on about release values. Simply put, these bindings look good, they’re priced reasonable, but be sure the fixed release-retention settings are right for you.
There is a somewhat understated revolutionary aspect to this binding. A T20 star drive adjusts the length, removes the U-spring cap, adjusts the lateral release — and tightens the mount screws. The one tool quiver! Only a few bindings offer this as a feature, and we love it. (That said, we’re not huge fans of T20 binding mount screws. We like pozidrive because it’s designed to cam out with too much torque instead of breaking the fastener or the tool. On the other hand, making everything T20 allows for smaller fastener heads where necessary so I see the point.) Bravo.
The mount. DIY paper jig worked well, but I found it a bit tricky to figure out where the heel unit boot length adjustment should be located since the binding only allows one centimeter of fore-aft adjustment (with possibly a couple mm cheat at either end of the spectrum). If you do a home mount, play around for a while and you’ll figure it out. At the ski shop, Dynafit’s jig will probably do it for you. Be careful.
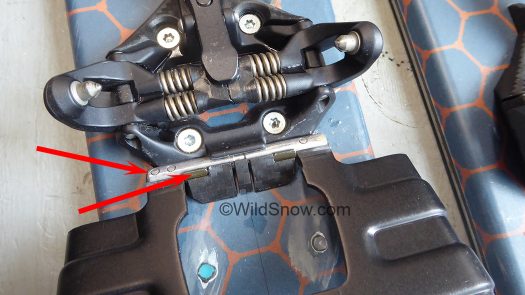
While mounting, take care that the crampon ‘hook’ is located properly. More, some crampons might have rivets that protrude just enough to be inconvenient, knock those down with a file.
TLT Speed crampon mount-hook is similar to that of any Dynafit Radical. As I discovered in my diligent scientific research, it can move a bit when you screw the binding down, thus slightly shrinking the size of the crampon slot. Check this with a crampon while you’re doing the mount. Also, some Dynafit crampons might have the bar rivets protruding a bit high and thus exacerbating a tight fit. Knock those down with a file if necessary.

Yes Jimmy, this is the 2016-2017 version of the venerable Vapor Nano, a bit stronger and skis better, at 1,244 grams that’s only 29 grams heavier than the original white top version. Good test bed that deserves a lightweight grabber.
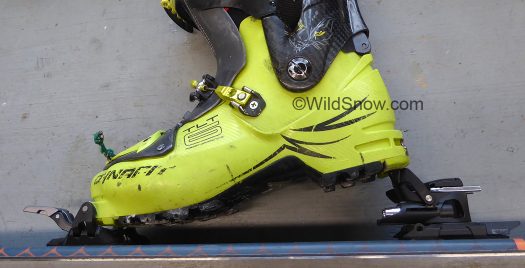
So, how does everything ski? My first test with any tech binding uphill is how well the toe springs hold without locking. I’d call TLT Speed average in this regard, which is fine. At around 160 pounds I could uphill the binding unlocked until I torqued fairly hard — that’ll work for tiptoeing in avalanche terrain. Next, boot heel lifters. You can get three practical (and four if you push it, see photos) heel heights from the TLT Speed. Rotate heel unit so pins are pointing rearward, with lifters stowed you’ve got nearly flat-on-ski boot delta. Flip the two lifters for a medium height and moderately high that’s fine for any reasonable skin track. Flipping the lifters with a ski pole basket is difficult, pole grip works better. Downhill, they felt like any other classic tech binding: a little soft at the heel yet entirely functional. However, note this type of heel construction results in significantly less “micro play” than many other tech binding heels. How much that really changes how they ski is an open question, but it does inspire confidence.
Whoops, almost forgot the skis. I’ll file a real review, but for now can say they’re indeed improved over the original Vapor Nano. Less nervous, more versatile. I don’t usually ride skis this fat, but these could change my habits. Only downside is with this much tip and front rocker I need the 179 cm length, and kick turns are hard with that much tail in the way. I like something just a few centimeters shorter. Details.
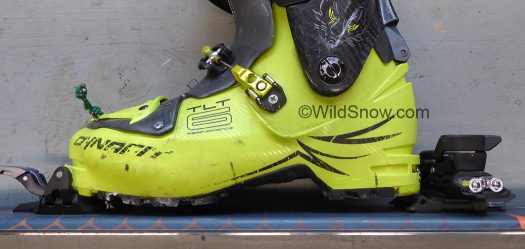
By rotating the heel unit to the side you can get a sort of faux heel super-flat mode. This is more in theory than practice, as the heel unit ends up just a few millimeters from boot heel and part of the binding overhangs the side of all but widest skis. Lowest practical heel lift is fine, it’s almost flat (see image below) and perfect for lowest angles on most uphills. Medium and high lifts are nicely designed.
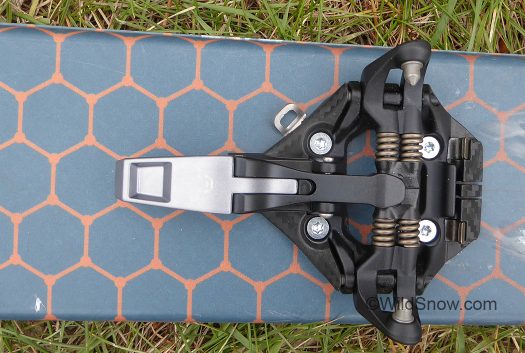
Toe is virtually a Radical 1.0, with a leash mount and noticeably lower on the ski by about 4 millimeters. Toe uses same screw hole pattern as all Dynafit Radical 1st generation. Heel is low as well; binding has a reasonable ramp angle in downhill mode. See our chart. The “wing springs” are stiff.
Conclusion: In either the TLT Speed or Speedfit version, a reasonably priced ski touring binding. Weight and configuration that’s totally doable. Some concerns about vertical release values. Care required during mount due to limited boot length adjustment range. Available brakes a plus for people wanting a worry free setup. Yet another reason to quit riding ski lifts.
TLT Speed total scale weight, no brake, with screws, 308 grams.
Toe unit weight, no screws, 116 grams.
Heel unit weight, no screws, 164 grams.
Ski brake stopper available, 75,90,105 mm.
Release values (RV) for retail version: Fixed upward said to be RV of 9, lateral adjustable 6-12
I already lashed up a paper mount template.
46 comments
Hey Lou,
So what are the ski binding deltas for these? They’re not yet on the table you inlked to (yet).
Thanks
Hi James, they’re in the chart, perhaps refresh browser cache. Lou
Just the post I was waiting for! And one tool to adjust. It is about time. As to fixed upward release, it makes me only slightly nervous. Nice looking clamps. Thanks for posting.
Yeah, using star drive for the one-tool is cool, allows for various size fastener heads, it’s a joy working on this sort of binding, instead of having a workbench covered with tools it’s much cleaner. Lou
Yes, I can’t help thinking that offering a range of “U” springs with varying upward RV’s would be a welcome selling point.
I recall being told the toe mounting pattern is the same as Speed Radical, and the heel has 2 out of 4 screws the same. Can you confirm, Lou?
Correct me if I’m wrong, but didn’t Dynafit advertise the vertical RV of the original Superlight 2.0 at 9 as well? No way that was a RV of 9. Almost impossible to step into compared to a Speed Radical or G3 Ion set at 9.
Agreed that selling a range of U springs for the vertical release would be appealing.
At $499 it would be a nice gesture if they just threw them in the box . . .
right on Greg
Two explanations I’ve heard directly from insiders with Dynafit.
1. These bindings are intended to be less costly, multiple spring options gets in the way of that. Sounds reasonable to me.
2. They don’t want users removing and swapping springs, due to possible over tightening of fasteners and other mishaps. Though I understand that take, it sounds less reasonable to me, considering most bindings already have multiple fasteners that probably the majority of users adjust themselves and can easily be over tightened or otherwise malfed.
All that said, I wouldn’t be surprised if the two U spring versions are offered as SKUs eventually so the lighter RV spring can be swapped into the Speed binding, or versa.
The spring is actually quite easy to mod and change release-retention value, how that changes durability is unknown. I modded the springs on my Superlite 2.0 and have quite a few days on them, with no problem. But that doesn’t really mean much. FYI, near as I can tell, the Superlite 2.0 and Speed-Speedfit springs are interchangeable.
Lou
Greg, when I said in the post that the binding toe is pretty much a Dynafit Radical toe, yes, the screw mount pattern is the same. Heel pattern is easy to check by comparing paper templates and glancing at a binding or two, I just did so and the Speed-Speedfit heel unit holes do not match any hole pairs of Radical, Speed Radical or Vertical. BUT, the rear pair of Speed-Speedfit holes do match those of a Superlite 2.0. Problem with that is in many situations reusing a hole pair won’t give the correct heel unit location for boot length, but it’s always of course worth trying. (and yes, it’ll be good to know what set of holes on a current Dynafit mechanical mount jig do match up, see ongoing comments below.)
I don’t imagine swapping from Radical or Vertical would be very common? Nor even swapping from a Superlite 2.0 to Speed-Speedfit?
Lou
Looks like a serviceable unit but its disappointing at that price point. Not a huge weight savings over the more versatile speed turn which is significantly cheaper.
Hi Lou,
I was told that the Tlt Speed and Speedfit can be mounted with current Dynafit jigs.
So, it’s suppossed that TLT Speed must have the same screw pattern as another current Dyna binding.
Can you confirm if it’s that way? wich binding has the same pattern??
Thanks!
Pablo
Hi Pablo, I’ve got a Dynafit mechanical jig that’s one generation removed from current, and none of the holes match up for the Speed-Speedfit rear unit, though as I mentioned above the Radical toe holes of course match.
I’ll ask about current matchup.
Meanwhile, Greg might have a current jig, perhaps he could print out my paper Speed-Speedfit template and see what matches.
https://www.wildsnow.com/backcountry-ski-pdfs/dynafit-tlt-speed-speedfit-2017-2018.pdf
Lou
I’ve spoken with senior shop personnel— people who are supposedly experts— about U spring type bindings (and others), and it was clear to me that they did not understand how the bindings work. For example, I was told that the adjuster on the Superlite 2 sets both lateral and vertical release. If the manufacturer decides they want to save money and/or discourage people from working on their bindings by limiting adjustability, that’s their prerogative. But some serious effort should be made to ensure that people know what they’re getting when they buy these products. Sorry to keep bringing this up, but I think the industry is not serving the consumer well in this regard.
There are ski shops where the senior shop personnel are actually experts… but not everywhere… Lots of what’s happened with tech bindings is due to the firm ISO/DIN standards for alpine bindings creating consumer false confidence in _all_ ski bindings. I’ve been amazed for thirty years at what people will assume a given tech binding will do. Lou
Here is the word from Dynafit on how mechanical jig screw holes match up with Speed-Speedfit:
“TLT Speed and Speedfit use the two rear holes of the Superlite and the two front holes of the Low Tech Race. The 4 holes are already in the right position on the Speedline jig which is the current jig for both of those bindings. If necessary, mark the current jigs. New jigs will come with a different sticker to highlight the update. No new jig needed if you have the Speedline.”
Lou
Mystery solved!!
how fast!!
Thanks Lou!!
Pablo
For last year I am using Kreuzspitze GT bindings. Have a look how they solved vertical release using U-spring – simple and reliable – I tested it on the bench – it really works!
Witold
And it is fully adjustable!
Witold
Just printed your template out and, as advertised, the Speedline jig (current) lets you use the Low Tech Race/PDG holes (red lines) for the front two holes and the Speed Superlight 2.0 (blue lines) ones for the rear.
Thanks Greg!
Witold: How are you liking those Kreuzspitze bindings? Any problems?
@ Eric
I had problem at the beginning. The lateral release was well below the expected range. As measured on the bench it was about 4 at maximum. After I flagged problem to Kreuzspitze they quickly send me replacement part. Now I am very happy. Light, fully adjustable in both axis. I am using them for 1 full year including resort skiing. Yes I would buy Kreuzspitze GT again. I could not justify buying ski bindings without upward release force adjustment.
Hello, I´m wondering in buying the tlt speed binding, and one of my worries where can I tied the guide leash? Does it have any specific spot?
Thank you
Pablo, yes it does. A small anchor point attached to the toe unit, specifically for attaching leash. Lou
Hi Lou. Considering these bindings. Been on TLT Speed Radicals for past few years. These bindings are lighter than the Speed Radicals, but the highest climb position is shorter (maybe 1/2”). Can you comment on this?
High lift of Speed and Speedfit is about the same as medium lift with Speed Radical. Highest climb position of Radical is significantly higher, ~.82 inches higher in comparison of setups I have here, that is _without_ Speed Rad toe shims to reduce ramp angle. Functionally, it’s safe to say that the Speed and Speedfit are not designed for people who want fairly high heel lifters.
The setups I’m comparing have roughly equivalent toe pin height above ski top, so they’re a good comparison.
Lou
Hi, I saw these in the shop and looks like the U shape of the production model has been machined thinner than what I see in your photo, any word on the final versions release value? I would assume with the missing material it would be much lower than your test version for stepping in and forward release. Also, are those delta angles in your binding chart correct? If so I’m guessing these would be a good match with the new Scarpa F1 and the ridiculous 20-22 degree forward lean, I mean it would make them feel like a more normal touring boots, thoughts?
Hoping a vertical release adjustable heel version is in the pipeline…basically a Speed Radical with bayonet heel??
In tinkering with the Speed and Speedfit, the toe springs are pretty robust–moreso than previous offerings. The metal lever is also pretty stout. When locking the toe lever, engaging the usual clicks requires noticeably more force than other Dynafit bindings I’ve worked with.
don´t be tricked by presumed safety buying a “high safety” binding with adjustable release in all directions. which releases backcountry skiing is a very demanding sport and requires high level of overall fitness. I see lots of people skiing too fast with too little control and some of them think that a fully automatic binding in the back country will do it…
I like the slick and simple design of the new Dynafit and will probably buy one soon…
Hi from Germany. Just skied wonderful San Juan Mountains in CO and although there isnt too much snow yet I am thrilled…
Have seen many sites that say vertical release is 8 TLT SPEED BINDING. is 9 the official Dynafit number?
Hi Lou,
Didn’t realize how much the difference would be between the heel risers of the radicals and speeds before I bought them. Any thoughts on how to add 0.82” to them. Guess I could duct tape a wood block to my boots on the ascent – jeez.
Thanks
Hello, my name is Mariana and I am writing from Argentina, I´ve just come back from Spain were I bought the TLT Speed Bindings at a store. First off all I was bad advised because for my level of ski (intermediate) and my weight (50 kg) I should not use more than din 5 in my bindings. Reading your blogs, because there is not much information on Dynafit site, I have realized that these bindings lack of the possibility off adjusting the Vertical Release Value (RV). They are built using a U spring as you mention which has a fixed RV value. I am really really concerned about injure myself skiing with these bindings in case I fell. So I had some questions:
1. Are you sure the RV DIN value of these bindings is different from the Speedfit?
2. Is there anything I can do to lower the vertical DIN values?
3. Is there anything I can do to lower the horizontal DIN values? I’ve tried taking out the metal washers that comes with the retention spring.
4. Is there any other binding using the same mounting holes for which I can replace this one without having to make new holes on my new skies? (yes, the store have already put the bindings in my new skies).
I live in Bariloche Argentina and for people here is really hard to have access to good touring equipment and really expensive, so imagine my feelings right now.
Thanks in advance!
Lou, thanks so much for curating this stupendous repository.
I am writing about the TLT Speed & Speedfit 2017-2018 template on this thread in comparison to your previous template for Radical 1.0 / Classic dated 2012. On the old sheet you have both a pivot line noted for toe mounting and the boot heel alignment line for rear mounting. These two lines aren’t on the on the TLT speed/speedfit sheet. Is that an oversight or am I perhaps missing some understanding of the speedfit installation? Thanks again.
Hi Elwood, those lines created confusion as to how to where to place boot on ski. You simply want to locate the binding toe in such a way as to locate the boot in the correct spot. Easiest is to simply attach binding to boot toe, set on ski, mark fore/aft position of one of the toe screws, then match toe template to that position. As for binding heel, do it after you get the toe screw holes where you want them. Some folks set up so binding heel is at mid range of boot length adjustment, others like to have it adjusted so it’s biased and can be changed for a much larger or smaller boot. Are you looking at our home mounting instructions? They’re perhaps over-thought but should make the process clear. https://www.wildsnow.com/16524/do-it-yourself-mount-dynafit-tech-ski-bindings/
If you’ve never done this stuff, practice on a piece of scrap lumber or a dumpster ski.
Lou
Thank you, that makes perfect sense.
I’m baffled! I’m self installing a new pair of speed fit bindings and can’t figure out how to install the cosmetic plastic piece on the front of the heel binding. ( I see yours is not installed) any tricks???? do I need it?
Thomas, put the cosmetic black piece in the heel first, then slide it onto the metal mount plate. Takes a bit of force to slide on, but keep at it. And no, it’s not necessary to have in place for the binding to function.
Lou, I’m wondering if you’ve used the Speed/Speedfit binding with brakes, and if so, how hard or easy was it to get into tour mode with brakes. Thanks.
Hi Mark,
I just had the speedfit bindings with brakes mounted on a new pair of skis. I like them as they are quite light, and very similar to my old verticals; i.e., solid and simple.
However, the tolerances on these bindings are really tight, and I would recommend a lot of practice on the carpet, before going out on the hill.
Two things:
The slots for ski crampons are really tight. They work, but need some lubricant and a bit of use to get them loosened up.
Same for brakes. The spring for the spring brake is very strong and requires a strong hand or two to completely retract the brake – which must be done to get into tour mode. In addition, the heel piece needs to be rotated over two little “nubs” to get it to hold the brake in place. I think they are there to prevent the brake from releasing on it’s own, but they are a real pain, as, again, the tolerances are tight.
I’ve been told by skimo.com that the nubs will wear down on their own, or I could also file them down a bit.
What I’ve found works best right now:
1) lubricate
2) with ski on ground, step on brake with boot to hold brake completely down
3) reach down and turn heel piece and maybe pull up a bit at front of heel piece to help it ride over the nubs.
As I said, a real pain – in fact, the dynafit instructions show three hands doing this operation (?!).
It did get easier with lubricant and practice – definitely not something to try for the first time at the trailhead!
Must admit, I miss the simpler operation of my old verticals.
Hope that helps; good luck
fred
Thanks Fred. Already tried manipulation in shop; result not too bad, but in field, could be a pain. Also applied silicone and found it to turn a bit smoother.
I’ve got the Speedift without brakes, now I bought the brakes and want to install them. Though the installation is straightforward, removing the plastic piece at the front of the heel part is not. It is firmly attached and I don’t want to brake anything by applying brute force in the wrong direction…
Can you tell me how this piece should be removed?
Thanks in advance
Just having the same problem as Juan and Tim, can anyone help how to remove the front part of the heel unit to be able to install brakes?
Lou, I just bought the speedfit binding and with my TLT 5’s the sole of the boot right at the tip of the toe rubs agains the metal of the to piece with every heel lift. Do you notice this with your 6’s?
I just got these and can’t figure out how the heck to install the brakes after the binding has been mounted…help!
Comments are closed.