Discerning spirit murmurs from the astral static is tough, but someone has to do it. With fingertips pressed to my forehead, I fold to the lotus and listen for the voice of Fritscheese. This ancient entity is something like perfectly crafted Swiss cheese only it can be re-frozen numerous times without any loss of flavor. Secret knowledge is revealed.
Turns out Tecton ski stoppers can be configured without the brake arms to make for a “brakeless” rig, and with a bit of care they’re not that tough to install during the mounting process (or when you decide to return from brakeless to brakes). Note this is not a review of the brakes, which have worked fine for us. This is a how-to on how to remove and install.
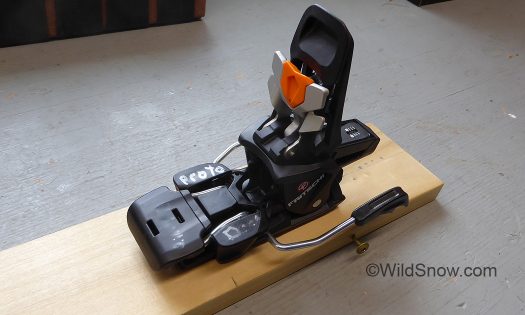
Fritschi Tecton on demo board with brake installed. I used my display prototypes for this so I wouldn’t risk messing up our binding test pair. Binding shown here in touring mode, for the brake removal and install set the binding as if it’s ready and “cocked” for heel step-in.
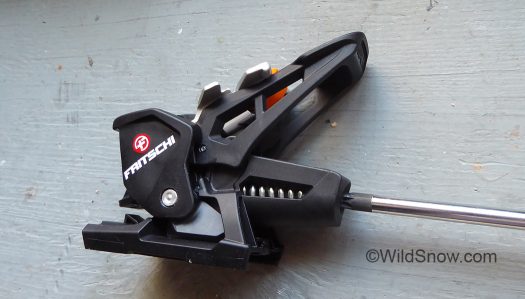
First step, whether binding is on ski or off, back off your vertical (upward) release tension so it’s easy to manipulate the binding cocking lever. As with any “alpine like” binding heel, in my opinion this is best done with the binding “closed” as if it has a boot in it, as shown here.
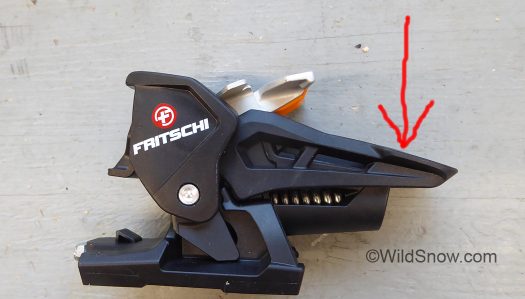
After loosening your forward (upward, vertical) release tension, cock the binding as if it is ready for downhill mode boot heel entry. This opens up the view on the side of the binding, so you can see the small plastic tabs that integrate with the brake.
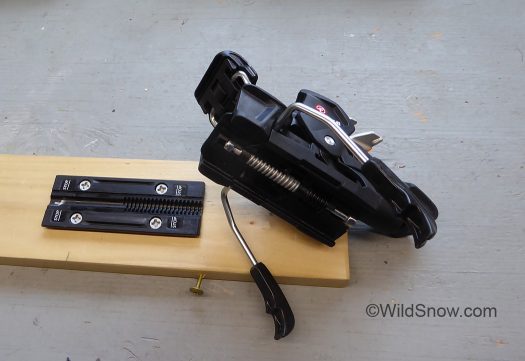
Part one, we’ll remove the brake. First step is move the heel unit rearward using the boot length adjustment screw (rotate counter clockwise), until the binding disengages from the mount plate, then slide the unit backwards off the mount plate.
(Important: All Tecton brake removal and installation should be done with binding heel “cocked” as if ready for downhill skiing step-in at the heel.)
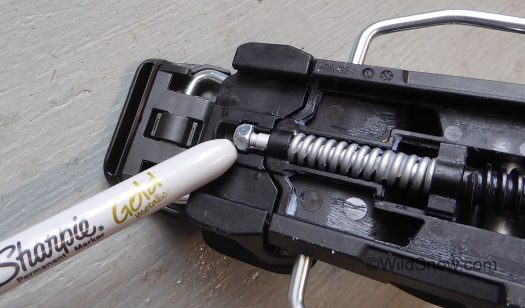
Examine underside, see that nut nested in its own pocket? Press the brake unit so that the nut disengages-lifts from the pocket, then firmly pull the entire brake unit off the heel unit. Removal is much easier than installation.
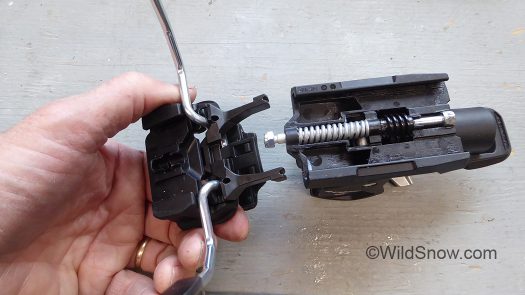
When the brake comes off it looks like this.
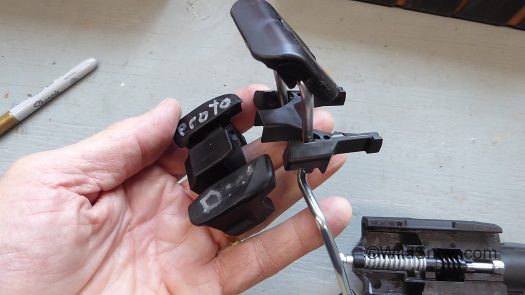
Next step is easy as well, again using firm pressure separate the brake pad unit (right) from the heel pad (left).
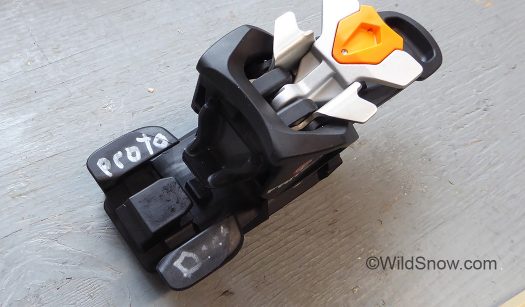
Sans brake arms, re-attach the heel pad to the heel unit, this step is intuitive.
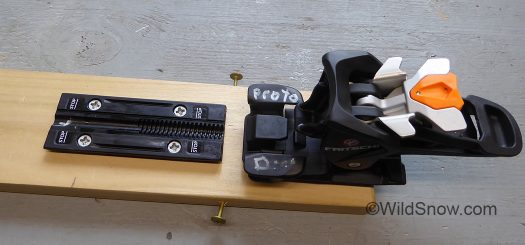
Keeping the parts together, slide the heel unit onto the mounting plate, from the rear. Press the unit firmly forward while clockwise rotating the boot length adjustment screw, you should feel the screw immediately engage. If not, wriggle and otherwise persuade the heel unit forward, again rotating the adjustment screw. In some cases it may be necessary to “persuade” the heel unit forward with _light_ taps from a rubber mallet. Note that the mount plate and adjustment gear are plastic, damage is possible if you force things, so take your time and use minimal “persuasion.”
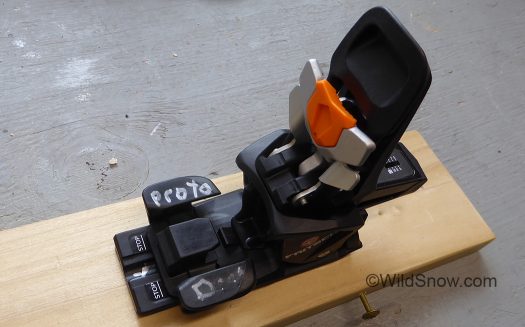
All done, adjust for boot length and carpe skium your brakeless Tecton.
Part 2, Install Tecton Brake:
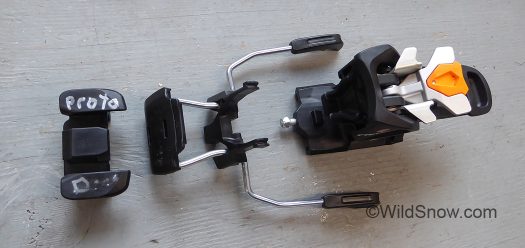
The challenge before you, three pieces (four if you count the mount plate on the ski).
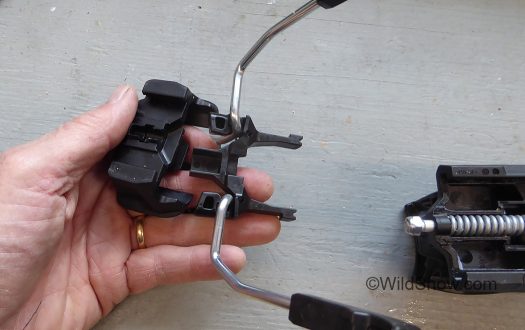
First step, work with the parts flipped so you’re looking at the underside. Insert the brake arm holder into the heel pad. My first try with this was frustrating. The mating shapes are fairly obvious but the pieces wouldn’t go together. Trick is to tilt the brake arm holder as you press it in, per photo below.
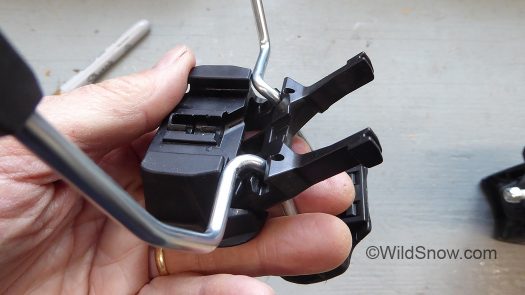
Tilt the brake arm holder and it’ll slip into the heel pad. When you get the angle right almost no effort is required.
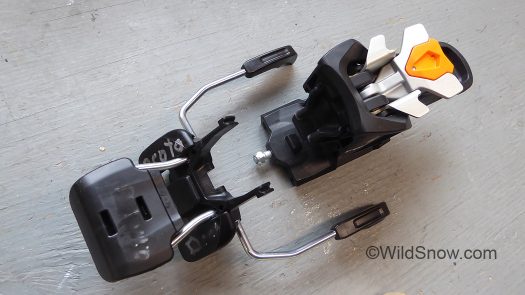
Next, the assembled brake needs to find its comfortable position, attached to the heel unit. You’ll again work with the parts flipped upside down, or from the side.

Slip the brake unit onto the binding heel unit, so the two plastic prongs made with the plastic tabs.
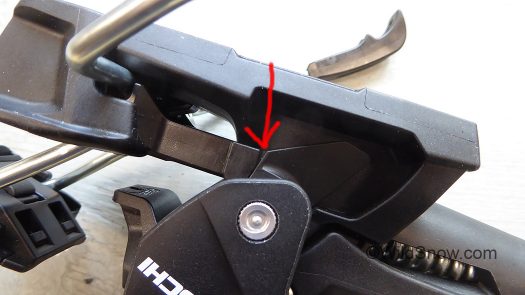
Another view of how parts need to integrate.
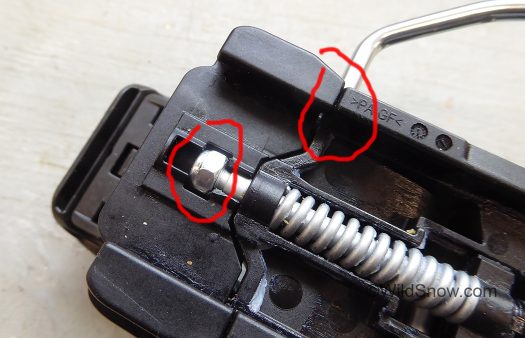
The other part of the process is to wriggle and otherwise convince the nut (circled in red) to nest in its slot. When you get all this right, the gap (red circle to right) will close up and everything will appear ready.

The completed heel unit should easily slide onto the binding mount plate, from the side it’ll look like this. As mentioned above, sometimes it’ll require some “English” to get the length adjustment worm gear engaging with the mount plate on the ski. Wriggle, press firmly forward, gently tap with rubber mallet if necessary.
And don’t forget, pressing ten fingers to your forehead will get you in touch with Fritscheese, though a rubber mallet can help as well.
Related links:
Our Tecton use review.
Tecton and Vipec Evo first looksee
Fritschi Tecton FAQ
WildSnow.com publisher emeritus and founder Lou (Louis Dawson) has a 50+ years career in climbing, backcountry skiing and ski mountaineering. He was the first person in history to ski down all 54 Colorado 14,000-foot peaks, has authored numerous books about about backcountry skiing, and has skied from the summit of Denali in Alaska, North America’s highest mountain.
18 comments
I’m not convinced, if this is the sort of rig you’re after why wouldn’t you go with G3’s Onyx?
Mac: Apart from being a ski touring binding there’s not much similarity between the dated G3 Onyx and the Tecton.
The Onyx is heavier
The Onyx has no alpine like heel
The Onyx has no elasticity at the toe
The Onyx has traditional tech style “safety” release
The Onxy is also cheaply manufactured compared to the more polished offerings from Fritschi. (Yes, I have skied both the Onyx and the Vipec)
Apart from being tried and tested, I don’t see what the Onyx has to offer, it might be more durable?
Thanks Etto. Lou
Nice, thanks Lou! Fritschi never ceases to push innovation in their area.
Sorry this is off the brake topic of the thread, but I haven’t been keeping up with the Tecton: The heel cup looks surprisingly narrow, like it doesn’t wrap around the heel at all, but mostly just deals with downward pressure and upward release. Is lateral retention/release accomplished within the toe unit of the binding?
I couldn’t quite decipher all the weird talk at the beginning of the article, but are you saying the brakes don’t work? There’s something wrong with them and that’s why you took them off? I can’t imagine why anyone would take off the brakes if they were functional.
Sorry Walt, I was just running along at the keyboard. The brakes work fine. I’ll add a few words to that effect.
It’s not a review of the brakes, just a how to DIY on installation and removal.
Lou
Nice write-up, Lou.
… Thom
Tabke, the Tecton has a narrow heel cup (they call it the “power cup”), but it has two vertical rails that fit into the boot heel tech fittings. Those are what prevent accidental sideways heel release. The lateral release is in the toe, similar to an alpine binding.
The power cup and vertical rails are shown about halfway down this post. https://www.wildsnow.com/21378/fritschi-ski-touring-evo-tecton-vipec/
Sorry if you have covered this before…how much weight is saved by removing the brakes?
Thx!
Ok,in the Tecton First Look you wrote 80g per brake.
Thx
Thanks Marc, I should have included that… forbidden knowledge and all that (smile).
Clamp a needle-nosed vicegrip in a vice, hook it behind the nylock nut and you can pop the nut right into its slot.
Lou — Thanks. This was helpful. I mounted new Tectons in the old Vipec holes. No issues until trying to assemble and install the brake. It does take some fiddling to get all brake parts in the right place and manage to snap the brake assembly onto the nut. Forward pressure is set when the screw is flush with the housing, correct?
I am not clear about the “STOP” lines on the Heelpiece rail plate.
The Front one is OK, moving the binding more to the front would mean less threads holding the binding secure fore&aft.Fine.
But the one in the back?.
If i respect both STOP lines i get about 7mm of travel for adjustment.
Which seems too little if i ever swap boots.
What is the most rear position for the binding on the rail plate?
On the aft STOP?
Flush with the rail plate?
Sorry if this has been covered elsewhere,the shop mounting instructions in Wildsnow are not clear enough for me…
Just finished a mounting….Thanks, Lou; the above details helped with assembling the brake unit, the real frustration was assembling brake unit to heel piece, until I studied the below YouTube from Fritschi that clears it up well and then went super easy if you follow their sequence (start with heal piece set to “ski”, insert brake unit, then flip heal to “walk” and it comes together with nut seating in it’s groove easily. Press around both pieces marrying up the edges, and install onto rail plate….then do a function check.).
Marc, your post is two months old but yes the margins for adjustment are not very big on the standard plate…however somewhere in my internet searches I saw what looks like a “Demo” heal piece rail plate from Fritschi that is much longer….perhaps BD has them to sell separately for dealers on demo days?
https://www.youtube.com/watch?v=STGdNEDWWxc&vl=en-US
Otherwise, nice looking/functioning bindings from the view of my bench….we’ll see how they ski this week….Cheers, -Jack
Good job Jack, let us know how they work in the field. Lou
Hi Lou,
So I recently purchased the Tecton after having been on Dynafits for years. All was fine for the first couple of tours but now I’m having issues with one of bindings during my last tour – which is frustrating. On one of the bindings the heel piece does not stay engaged when in walk mode. At the slightest tap, the heel becomes disengaged and sends the brake into release mode. This is even occurring when the riser is on. Things that set off the brake are touching a twig with the brake or even the inner brakes touching while skinning.
I’ve called the BD warranty department and they said this has not been reported to them and to dry skis and spray down with white lithium grease – which I’ve done – and tested in my living room with just mildly touching the affected binding and it has not helped.
I had the skis mounted at a small local ski shop and am wondering if they were mounted incorrectly because if the complexity.
Any thoughts?
Well, one of the biggest jokes in the industry is the statement “we’ve never seen that…” or “Only .00011% of bindings have had that problem…” The latter which of course means nothing if you happen to be the .00011. In any case, I doubt it’s a mounting problem but you should be able to compare one binding to the other and see, if your local shop won’t help you never do business with them again. A good shop would test on bench, see the problem, and immediately remedy for their valuable customer. Or perhaps they don’t need customers and are just running a ski shop as a hobby? Recommend Cripplecreekbc.com or Skimo.com as shops that care, and specialize, and would be happy to take your business. Lou
Comments are closed.